
AWT GUI Facade (6): Mouse and Game Loop
After loading a level, I now propose to add interaction with the use of a mouse. This will be an opportunity to see two other patterns: the Observer Pattern to handle mouse events, and the Game Loop Pattern for synchronization between controls, updates, and display.
This post is part of the AWT GUI Facade series
Mouse Facade
To add the management of the mouse to the facade, I propose to introduce a new Mouse interface that contains all the functions related to the mouse:
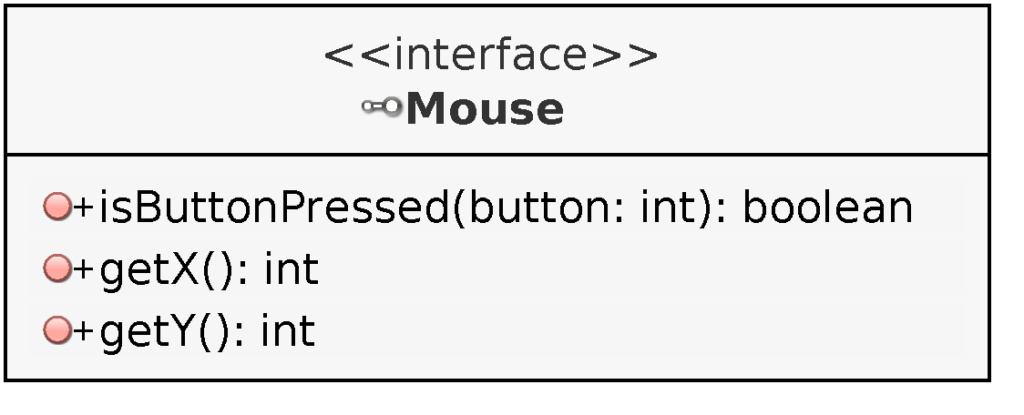
Separating the interface for the mouse from the general interface of the facade has two advantages: lighten the general interface and allow the simultaneous management of several mice.
As far as methods are concerned, I chose the simplest API possible:
- isButtonPressed() method: returns true if a button is pressed;
- getX() and getY() methods: return the (x, y) coordinates of the cursor in the window
This API is also lowlevel, to match what most graphic libraries offer. In addition, it allows having at any time the complete state of the mouse, which is often necessary for video games.
For the general GUIFacade interface, a new getMouse() method is added to return an implementation of the Mouse interface.
Mouse handling in AWT
To implement this interface, AWT library included in the standard Java library is still used. This one offers a high-level API, which meets the needs of office applications. It is based on the Observer Pattern, which allows an element to observe (or listen to) another element, and to be notified when an event occurs. In the case of the mouse, these events are for example the pressure of a button or the movement of the cursor.
This API is divided into several interfaces, for example, the interface MouseListener allows to manage the events related to the buttons:
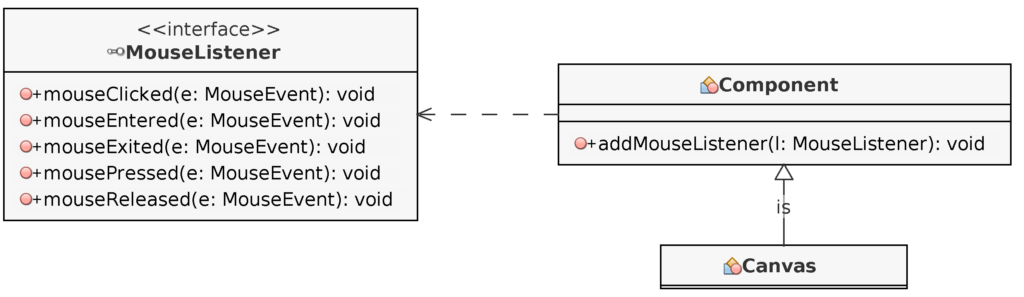
The MouseListener interface contains the methods implemented by the observer: for example, when a button is pressed, the mousePressed() method is called and the observer can then act accordingly. The Component class, which is the superclass of many graphic components within AWT, can be observed by anyone who requests it thanks to the addMouseListener() method. For the example of this article, it is the Canvas used to make the level of the game that is observed: each action of the mouse in its display area causes calls to the methods of the MouseListener interface.
Facade implementation
I propose that the implementation of the Mouse interface of the facade takes the form of an AWTMouse class:
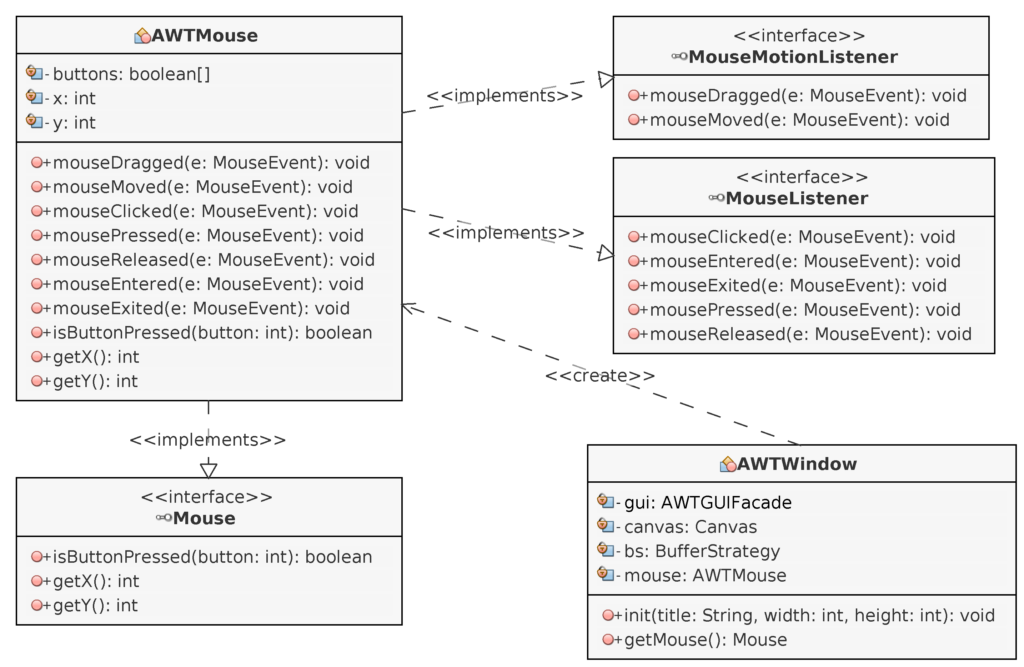
The class implements the Mouse, MouseListener, and MouseMotionListener interfaces. The first methods provide information about the mouse (contained in its attributes):
public class AWTMouse implements Mouse, MouseListener, MouseMotionListener {

    private final boolean[] buttons;

    private int x;

    private int y;

    public AWTMouse() {
        buttons = new boolean[4];
    }

    @Override
    public boolean isButtonPressed(int button) {
        if (button >= buttons.length) {
            return false;
        }
        return buttons[button];
    }

    @Override
    public int getX() {
        return x;
    }

    @Override
    public int getY() {
        return y;
    }

    ...
The following ones respond to mouse events and update mouse information:
@Override
    public void mouseClicked(MouseEvent e) {
    }

    @Override
    public void mousePressed(MouseEvent e) {
        if (e.getButton() <= 3) {
            buttons[e.getButton()] = true;
        }
    }

    @Override
    public void mouseReleased(MouseEvent e) {
        if (e.getButton() <= 3) {
            buttons[e.getButton()] = false;
        }
    }

    @Override
    public void mouseEntered(MouseEvent e) {
    }

    @Override
    public void mouseExited(MouseEvent e) {
    }

    @Override
    public void mouseDragged(MouseEvent e) {
        x = e.getX();
        y = e.getY();
    }

    @Override
    public void mouseMoved(MouseEvent e) {
        x = e.getX();
        y = e.getY();
    }
}
Finally, the AWTWindow class contains as before the canvas, and this one is used to "listen" the events of the mouse:
public void init(String title, int width, int height) {

    ...

    mouse = new AWTMouse();
    canvas.addMouseListener(mouse);
    canvas.addMouseMotionListener(mouse);
}
Game Loop
It only remains to exploit this new interface in an example. To do this, I propose to introduce the Game Loop Pattern in its simplest version (without multi-threaded considerations). It is based on a set of methods that can be grouped together in the same class:
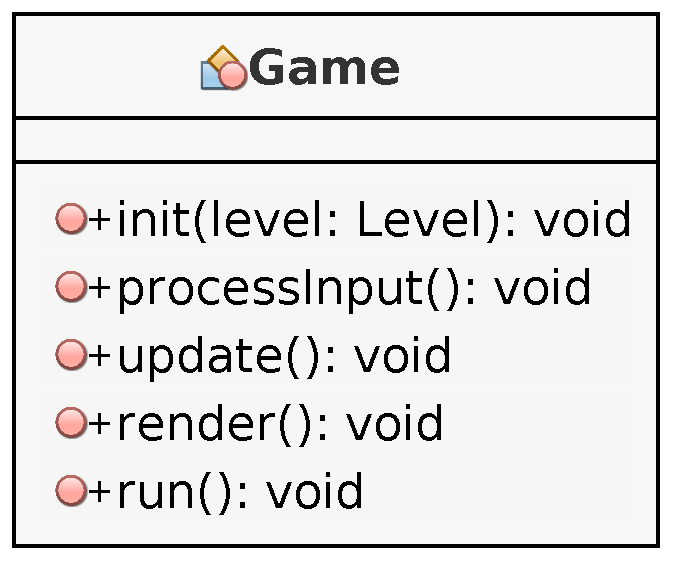
- The init() method is called at startup to initialize the game and its data;
- The processInput() method is called at each iteration of the game to manage the controls (keyboard, mouse, ...). In short, its main role is to transform the user's "instructions" into more abstract "orders" or "commands" that the game engine knows how to interpret. Considering time, these operations go to the rhythm of the user.
- The update() method applies changes to game data based on various sources, such as commands produced by user controls or operations that must be applied to each update. Considering time, these operations go to the speed of the game engine.
- The render() method handles display. This method will most often order or transfer data on the graphics card, the latter dealing with very low-level tasks at the pixel level. Considering time, these operations go to the refresh rate of the screen (default 60Hz).
- The run() method calls the previous ones and contains the actual game loop.
In this example, I don't implement all the elements required to meet all these principles. I propose here a basic form of this pattern, sufficient to begin to understand all these notions.
For the init() method, we build the two layers and initialize the window:
public void init(Level level) {
    this.level = level;

    backgroundLayer = gui.createLayer();
    backgroundLayer.setTileSize(level.getTileWidth(),level.getTileHeight());
    backgroundLayer.setTexture(level.getTilesetImage(0));
    backgroundLayer.setSpriteCount(level.getWidth()*level.getHeight());

    groundLayer = gui.createLayer();
    groundLayer.setTileSize(level.getTileWidth(),level.getTileHeight());
    groundLayer.setTexture(level.getTilesetImage(1));
    groundLayer.setSpriteCount(level.getWidth()*level.getHeight());

    gui.createWindow("Mouse handling",
        scale*level.getTileWidth()*level.getWidth(),
        scale*level.getTileHeight()*level.getHeight());
}
For the processInput() method, if the following conditions are met:
- the left button is pressed;
- there is a cell of the level under the cursor;
- the tile of this cell is in the second set of tiles (the one of the second layer),
then we put a tile with grass (this will erase all buildings in the map):
public void processInput() {
    Mouse mouse = gui.getMouse();
    if (mouse.isButtonPressed(MouseEvent.BUTTON1)) {
        int x = mouse.getX() / (scale*level.getTileWidth());
        int y = mouse.getY() / (scale*level.getTileHeight());
        if (x >= 0 && x < level.getWidth() && y >= 0 && y < level.getHeight()) {
            if (level.getTileset(x,y) == 1) {
                level.setTileset(x,y,0);
                level.setTile(x,y,new Point(7,0));
            }
        }
    }
}
For the update() method, the content of the level data is used to define the sprite textures. It is the same as in the previous post, except that this operation is repeated regularly:
public void update() {
    for(int y=0;y<level.getHeight();y++) {
        for(int x=0;x<level.getWidth();x++) {
            int index = x + y * level.getWidth();
            backgroundLayer.setSpriteLocation(index, new Rectangle(scale*x*level.getTileWidth(), scale*y*level.getTileHeight(), scale*level.getTileWidth(), scale*level.getTileHeight()));
            if (level.getTileset(x, y) == 0) {
                Rectangle tile = new Rectangle(level.getTile(x, y), new Dimension(1,1));
                backgroundLayer.setSpriteTexture(index, tile);
            }
            else {
                backgroundLayer.setSpriteTexture(index, null);
            }
        }
    }

    for(int y=0;y<level.getHeight();y++) {
        for(int x=0;x<level.getWidth();x++) {
            int index = x + y * level.getWidth();
            groundLayer.setSpriteLocation(index, new Rectangle(scale*x*level.getTileWidth(), scale*(y-1)*level.getTileHeight(), scale*level.getTileWidth(), scale*2*level.getTileHeight()));
            if (level.getTileset(x, y) == 1) {
                Rectangle tile = new Rectangle(level.getTile(x, y), new Dimension(1,2));
                groundLayer.setSpriteTexture(index, tile);
            }
            else {
                groundLayer.setSpriteTexture(index, null);
            }
        }
    }
}
The render() method just draws the two layers:
public void render() {
    if (gui.beginPaint()) {
        gui.drawLayer(backgroundLayer);
        gui.drawLayer(groundLayer);
        gui.endPaint();
    }
}
Finally, the run() method contains the game loop that calls the other methods at most 60 times per second:
public void run() {

    int fps = 60;
    long nanoPerFrame = (long) (1000000000.0 / fps);
    long lastTime = 0;

    while(!gui.isClosingRequested()) {
        long nowTime = System.nanoTime();
        if ((nowTime-lastTime) < nanoPerFrame) {
            continue;
        }
        lastTime = nowTime;

        processInput();
        update();
        render();

        long elapsed = System.nanoTime() - lastTime;
        long milliSleep = (nanoPerFrame - elapsed) / 1000000;
        if (milliSleep > 0) {
            try {
                Thread.sleep (milliSleep);
            } catch (InterruptedException ex) {
                ex.printStackTrace();
            }
        }
    }
    gui.dispose();
}
This basic implementation of the Game Loop pattern does not respect all its principles. There is no real notion of control, and it will be difficult to run each part at different rates. In addition, in terms of design, there are also questionable choices, like the Level class that serves as both a level loader, storage for the level, and a form of buffer. Through future posts, I will present all that is needed to achieve more effective implementations.
The code of this post can be downloaded here:
To compile: javac com/learngameprog/awtfacade06/Main.java
To run: java com.learngameprog.awtfacade06.Main