
Discover Python and Patterns (25): Menu
In this post, I show how to create a menu with Pygame, using the Game Loop pattern.
This post is part of the Discover Python and Patterns series
Objective
We create a new program (independent from the previous one) that implements a game menu:
Game Loop pattern
I create the menu following the Game Loop pattern. This approach allows us to use it later inside our game. I create the following class that embeds all that we need to create the menu:
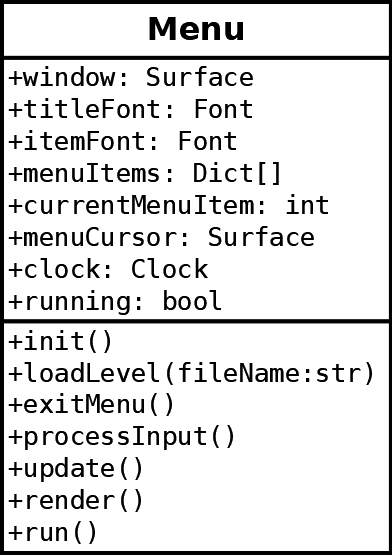
Attributes:
window: a Pygame window;titleFontanditemFont: Pygame fonts for the title and menu items;menuItems: the content of the menu (more details below);currentMenuItem: the index of the currently selected menu item;menuCursor: a Pygame surface for the menu cursor (a tank pointing to the currently selected item);clock: a Pygame clock to limit the frame rate (60Hz);running:Trueuntil the end of the program.
Methods:
init(): the initialization method called once. We create the window, the fonts, the menu items, and the variables that describe the current state of the menu;loadLevel(): we call it when the player selects a level in the menu. For now, it only displays a message in the console;exitMenu(): we call it when the player selects theQuitmenu item. It sets therunningattribute toFalse;processInput(): parses Pygame events to find key presses and act accordingly. Up/Down arrow keys increase/decreasecurrentMenuItemand Return key triggers the action corresponding to the currently selected item;update(): does nothing because the menu is so simple that we don't need to follow the Command pattern. It is better to create it anyway, in case our game evolves and we need more advanced features;render(): renders the menu;run(): the main game loop.
Representing the menu items
I store all the menu item data using several interesting features of the Python language:
self.menuItems = [
    {
        'title': 'Level 1',
        'action': lambda: self.loadLevel("level1.tmx")
    },
    {
        'title': 'Level 2',
        'action': lambda: self.loadLevel("level2.tmx")
    },
    {
        'title': 'Quit',
        'action': lambda: self.exitMenu()
    }
]
First of all, the menuItems attribute is a list, because we start it and end with brackets []. A comma separates each item of this list:
self.menuItems = [ item1, item2, ... ]Each item of the list is a dictionary because of the braces {}. For instance, the first item is:
{
    'title': 'Level 1',
    'action': lambda: self.loadLevel("level1.tmx")
}
Like we saw before, each element of the dictionary has a unique key. In this example, the first key is 'title' and the second one is 'action'. We could update the content of this first menu item in the following way:
self.menuItems[0]['title'] = 'Level 1'
self.menuItems[0]['action'] = lambda: self.loadLevel("level1.tmx")
As you can see, you can stack indices: [0] is the index of the first item in the menuItems attribute, and ['title'] is the index of the "title" item in the self.menuItems[0] dictionary.
About values, the one of 'title' is the message to display for the menu item. The one of 'action' is new: it is a lambda function. It is the function to call when the player asks for its execution.
Lambda functions are powerful features available in most programming languages. They allow the creation of anonymous inline functions. Without lambdas, you must create a function and find a unique name:
def loadLevel1():
    menu.loadLevel("level1.tmx")
self.menuItems[0]['action'] = loadLevel1
As you can see, we save several code lines and get a clear syntax. Moreover, it can transparently embed variables, in which case the lambda is a closure. In this example, the function automatically embedded the self variable. It means that, when you call the lambda, it knows who is self, and it correctly refers to the menu instance.
The init() method
This method initializes the menu:
def __init__(self):
    # Windows
    pygame.init()
    self.window = pygame.display.set_mode((1280, 720))
    pygame.display.set_caption("Discover Python & Patterns - https://www.patternsgameprog.com")
    pygame.display.set_icon(pygame.image.load("icon.png"))

    # Font
    self.titleFont = pygame.font.Font("BD_Cartoon_Shout.ttf", 72)
    self.itemFont = pygame.font.Font("BD_Cartoon_Shout.ttf", 48)

    # Menu items
    self.menuItems = [
        {
            'title': 'Level 1',
            'action': lambda: self.loadLevel("level1.tmx")
        },
        {
            'title': 'Level 2',
            'action': lambda: self.loadLevel("level2.tmx")
        },
        {
            'title': 'Quit',
            'action': lambda: self.exitMenu()
        }
    ]
    self.currentMenuItem = 0
    self.menuCursor = pygame.image.load("cursor.png")

    # Loop properties
    self.clock = pygame.time.Clock()
    self.running = True
Lines 3-6 create the window and set an icon like we did it previously.
Lines 9-10 create Pygame fonts for the title and the menu items. Note that I load a file "BD_Cartoon_Shout.ttf" in the game assets rather than using a system font. It is safer, and we are sure of the final rendering. I downloaded the font on https://www.dafont.com; it is free for use for any purpose.
Lines 13-26 initialize the game menu, as presented in the previous section.
Line 27 sets the currently selected menu item on the first one. Remind that indices start at 0!
Line 28 loads an image for the menu cursor (a tank pointing to the right).
Lines 31-32 create a Pygame clock to limit the frame rate and a running variable to stop the main loop.
The processInput() method
This method parses the Pygame events list to move the cursor and trigger menu actions:
def processInput(self):
    for event in pygame.event.get():
        if event.type == pygame.QUIT:
            self.exitMenu()
            break
        elif event.type == pygame.KEYDOWN:
            if event.key == pygame.K_DOWN:
                if self.currentMenuItem < len(self.menuItems) - 1:
                    self.currentMenuItem += 1
            elif event.key == pygame.K_UP:
                if self.currentMenuItem > 0:
                    self.currentMenuItem -= 1
            elif event.key == pygame.K_RETURN:
                menuItem = self.menuItems[self.currentMenuItem]
                try:
                    menuItem['action']()
                except Exception as ex:
                    print(ex)
Lines 3-5 call the exitMenu() method if the QUIT event is triggered (for instance, if the user clicks the close button of the window).
Lines 7-12 handle arrows keys and update the currentMenuItem attribute accordingly.
Lines 14-18 are the most interesting. If the player presses the return key, the menuItem refers to the currently selected menu item (line 14). Line 16 calls the function stored in the 'action' key of this menu. We could write it with an intermediate variable:
actionFunction = menuItem['action']
actionFunction()
Note that actionFunction as well as menuItem['action'] don't contain the function. As for objects, they refer to the function. These lines never copy any function, only references.
A try...except block surrounds line 16. Thanks to this syntax, if an error occurs, then Python executes the block following the except statement. In this example, we print the message of the exception (line 18) to help us find the bug. Note that the error can occur anywhere inside the block. It includes inside a function, or inside a function called by a function, etc. In all cases, execution stops and goes straight to the block following the except statement.
The render() method
This method renders the menu:
def render(self):
    self.window.fill((0, 0, 0))

    # Initial y
    y = 50

    # Title
    surface = self.titleFont.render("TANK BATTLEGROUNDS !!", True, (200, 0, 0))
    x = (self.window.get_width() - surface.get_width()) // 2
    self.window.blit(surface, (x, y))
    y += (200 * surface.get_height()) // 100


    # Compute menu width
    menuWidth = 0
    for item in self.menuItems:
        surface = self.itemFont.render(item['title'], True, (200, 0, 0))
        menuWidth = max(menuWidth, surface.get_width())
        item['surface'] = surface

    # Draw menu items
    x = (self.window.get_width() - menuWidth) // 2
    for index, item in enumerate(self.menuItems):
        # Item text
        surface = item['surface']
        self.window.blit(surface, (x, y))

        # Cursor
        if index == self.currentMenuItem:
            cursorX = x - self.menuCursor.get_width() - 10
            cursorY = y + (surface.get_height() - self.menuCursor.get_height()) // 2
            self.window.blit(self.menuCursor, (cursorX, cursorY))

        y += (120 * surface.get_height()) // 100


    pygame.display.update()
Preparation
We first erase the window content (line 2).
We use a y variable to store the current height of the menu (line 5). We draw from top (low y values) to bottom (high yvalues).
Draw the title
Lines 8-11 in the render() method draw the title:
surface = self.titleFont.render("TANK BATTLEGROUNDS !!", True, (200, 0, 0))
x = (self.window.get_width() - surface.get_width()) // 2
self.window.blit(surface, (x, y))
y += (200 * surface.get_height()) // 100
The first line creates a Pygame surface with the text "TANK BATTLEGROUNDS !!" rendered with antialiasing (True) and with a red color (200, 0, 0).
The second line computes the x coordinate that centers this text on the screen. It is a common computation: (total_size - object_size) divided by 2. Here, the total size is the width of the window self.window.get_width(), and the size of the object is the width of the surface that contains the text surface.get_width(). The // symbol is the integer division (otherwise, we would get a float value).
The third line blits the surface with the text.
The last line updates the height of the menu so that the next texts are below. The computation is an integer percentage computation. In this line, I compute 200% of the text height. You can simplify it to a multiplication by 2, but it won't speed up the computation, most compilers do it by themselves. I let it in this form, in case I change my mind. If I want to change it, I only have to replace the 200 in the expression.
Compute the menu width
Lines 15-19 computes the width of the menu. We need this width to center the menu:
menuWidth = 0
for item in self.menuItems:
    surface = self.itemFont.render(item['title'], True, (200, 0, 0))
    menuWidth = max(menuWidth, surface.get_width())
    item['surface'] = surface
The menu width is initialized to 0 (first line).
Then, we iterate through the menu (second line).
We render the text of the menu item into a Pygame surface (third line).
We keep the maximum value between the current menu width and the surface width (fourth line).
Finally, we save the surface in the menu item (fifth line). This last step is not mandatory; this is to save some computations and avoid the re-rendering of the text in the next loop.
Draw the menu items
Lines 22-34 draw the menu items:
x = (self.window.get_width() - menuWidth) // 2
for index, item in enumerate(self.menuItems):
    # Item text
    surface = item['surface']
    self.window.blit(surface, (x, y))

    # Cursor
    if index == self.currentMenuItem:
        cursorX = x - self.menuCursor.get_width() - 10
        cursorY = y + (surface.get_height() - self.menuCursor.get_height()) // 2
        self.window.blit(self.menuCursor, (cursorX, cursorY))

    y += (120 * surface.get_height()) // 100
The first line computes an x coordinates so that the menu is centered. It is the same formula as the one we saw for centering the title.
The second line iterates through the menu items using enumerate. This statement provides the index of each item of a list in addition to the items.
The two first lines of the for block draws the current menu item. Since we saved a surface in the previous loop, we don't need to re-compute it.
The next group of lines draws the menu cursor if the item is the currently selected one. We draw the cursor left to the item text and center it vertically.
The last line of the for block increases the current menu height by 120% of the menu item height.
Final code
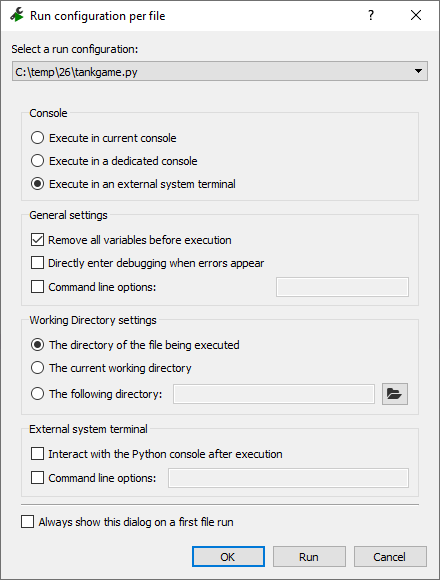
When running the program from Spyder, click the Run / Configuration per file menu item. In the Console group, select Execute in an external system terminal. In the General settings group, check Remove all variables before execution. Sometimes Pygame has trouble creating fonts, and these options can resolve the issue.
In the next post, we'll merge this program with the main one to get a menu inside our game.