
Discover Python and Patterns (26): Game modes
To merge the menu in the previous post with the tank game, I create game modes thanks to an improved Game Loop pattern.
This post is part of the Discover Python and Patterns series
Objective
I want to create the three followings game modes:
- The default game, where the player controls a tank;
- A menu, where the player selects an option, like load a level or quit the game;
- A message.
Furthermore, I want to mix these modes. For instance, if the menu or the message mode pops up, then the play game mode should be still visible in the background, but in a frozen state.
You can see these modes in actions here (note that the third level does not exist; it is to test the case of errors):
Game modes
I create these game modes as if a was creating three "games" that use the Game Loop pattern:
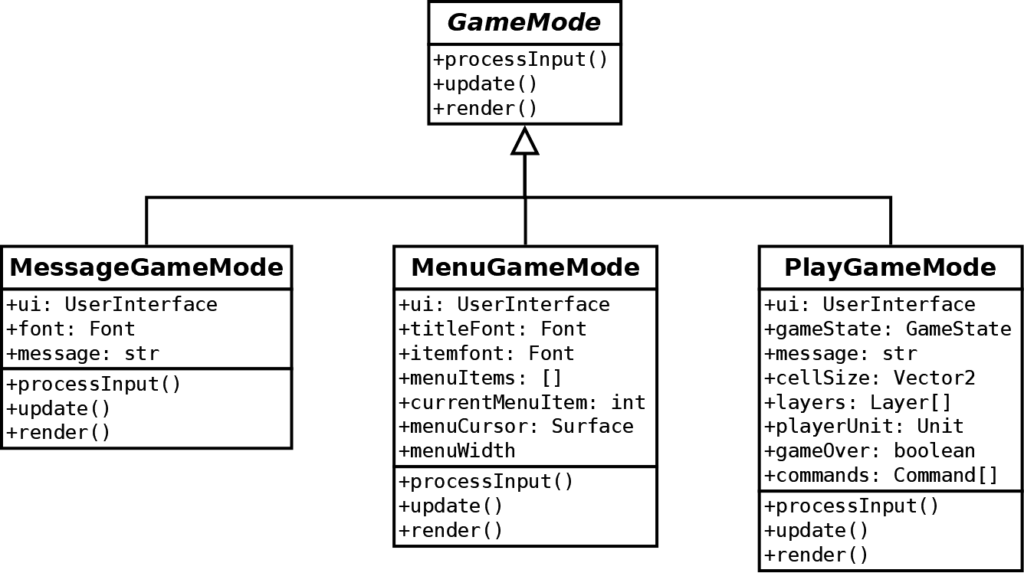
The three child class inherits the GameLoop base class that defines the behavior methods of the Game Loop pattern: processInput(), update() and render().
It means that, if someone creates an instance of one of these child class, and calls their methods in the main game loop, then it will run as if there were one implementation of the Game Loop pattern. For instance, we could run one of them using a code that looks like this one:
running = True
clock = pygame.time.Clock()
gameMode = MenuGameMode(...) # or PlayGameMode(...) or MessageGameMode(...)
while running:
    gameMode.processInput()
    gameMode.update()
    gameMode.render()
    pygame.display.update()
    clock.tick(60)
Overlay
Thanks to this approach, we can also mix the different modes, as if we were running different games in parallel.
We implement this in the run() method of the UserInterface class that contains the main game loop:
while self.running:
    # Inputs and updates are exclusives
    if self.currentActiveMode == 'Overlay':
        self.overlayGameMode.processInput()
        self.overlayGameMode.update()
    elif self.playGameMode is not None:
        self.playGameMode.processInput()
        try:
            self.playGameMode.update()
        except Exception as ex:
            print(ex)
            self.playGameMode = None
            self.showMessage("Error during the game update...")

    # Render game (if any), and then the overlay (if active)
    if self.playGameMode is not None:
        self.playGameMode.render(self.window)
    else:
        self.window.fill((0,0,0))
    if self.currentActiveMode == 'Overlay':
        darkSurface = pygame.Surface(self.window.get_size(),flags=pygame.SRCALPHA)
        pygame.draw.rect(darkSurface, (0,0,0,150), darkSurface.get_rect())
        self.window.blit(darkSurface, (0,0))
        self.overlayGameMode.render(self.window)

    # Update display
    pygame.display.update()
    self.clock.tick(60)
This method contains two main parts: the first one lets the player controls the tank or the cursor in the menu (but not both). The second part renders the game and overlays the menu or a message (if there is one).
We need new attributes in the UserInterface class:
currentActiveMode: a string that defines the current mode: running game or paused game with an overlay game mode;overlayGameMode: the current game mode to overlay (if any). It can be an instance ofMenuGameModeorMessageGameMode;playGameMode: the current game mode to play (if any).
Switch controls
The first part of the loop in the run() method switches the control between the game and the overlay:
if self.currentActiveMode == 'Overlay':
    self.overlayGameMode.processInput()
    self.overlayGameMode.update()
elif self.playGameMode is not None:
    self.playGameMode.processInput()
    try:
        self.playGameMode.update()
    except Exception as ex:
        print(ex)
        self.playGameMode = None
        self.showMessage("Error during the game update...")
If the currently active mode is an overlay one (line 1), then we call the processInput() and update() methods of this game mode (lines 2-3). In the case of the menu game mode, the player can control the cursor and select an image. In the case of the message game mode, the player can hit space or enter to continue.
If the currently active mode is the game (line 4), then we call the methods of the PlayGameMode class (lines 5-11). On the contrary to the previous case, we expect errors to happen. It is better to display an error message to the player rather than crashing the application. We could also implement more robust behaviors, like restoring the last saved game.
You can recognize the try ... except statement that surrounds the lines to watch. In this example, we catch exceptions raised during the update of the game state. If this is the case, the code flow goes directly to the block of the exceptstatement.
The except block displays the message of the exception to help us understand why something goes wrong (line 9). Then, it deletes the current play game mode (line 10) and displays a message (line 11). The showMessage() enables a message game mode overlay with the text in the argument.
Render twice
The second part of the run() method can render two "games" at the same time:
if self.playGameMode is not None:
    self.playGameMode.render(self.window)
else:
    self.window.fill((0,0,0))
if self.currentActiveMode == 'Overlay':
    darkSurface = pygame.Surface(self.window.get_size(),flags=pygame.SRCALPHA)
    pygame.draw.rect(darkSurface, (0,0,0,150), darkSurface.get_rect())
    self.window.blit(darkSurface, (0,0))
    self.overlayGameMode.render(self.window)
We first render the game if there is one, or fill the screen with black if there is none (lines 1-4).
If the currently active mode is an overlay (line 5), then we darken the background (lines 6-8) and render the overlay (line 9). We create the darkening with a surface with an alpha channel (line 6) where we draw a rectangle with black and transparency (line 7). The color (0,0,0,150) means red=0, green=0, blue=0 and alpha=150. An alpha of 0 is fully transparent, and an alpha of 255 is fully opaque.
Play game mode
The PlayGameMode class runs the game as before. It is like the previous UserInterface class, except that we remove the main game loop.
The update() method handles the end of the game, right after the game update:
if self.playerUnit.status != "alive":
    self.gameOver = True
    self.ui.showMessage("GAME OVER")
else:
    oneEnemyStillLives = False
    for unit in self.gameState.units:
        if unit == self.playerUnit:
            continue
        if unit.status == "alive":
            oneEnemyStillLives = True
            break
    if not oneEnemyStillLives:
        self.gameOver = True
        self.ui.showMessage("Victory !")
If the player is dead (line 1), the gameOver attribute is set to True (line 2). We use this attribute in the processInput() to ignore player commands when it is True. The game can be over if the player wins or loses. We also display a "GAME OVER" message (line 3). It uses the showMessage() method of the UserInterface class that activates a message game mode with the message in the argument.
If the player is still alive (line 4), we iterate through all enemies to see if they are all dead (lines 5-11). If all enemies are dead (line 12), the player wins, and we display a victory message (lines 13-14).
Menu game mode
The MenuGameMode class is very similar to the one we created in the previous post to implement a menu. The main difference is the list of items and what they trigger:
self.menuItems = [
    {
        'title': 'Level 1',
        'action': lambda: self.ui.loadLevel("level1.tmx")
    },
    {
        'title': 'Level 2',
        'action': lambda: self.ui.loadLevel("level2.tmx")
    },
    {
        'title': 'Level 3',
        'action': lambda: self.ui.loadLevel("level3.tmx")
    },
    {
        'title': 'Quit',
        'action': lambda: self.ui.quitGame()
    }
]
Each menu item calls a method of the UserInterface when selected. For instance, to load a level, we call the loadLevel() method of the UserInterface:
def loadLevel(self, fileName):
    if self.playGameMode is None:
        self.playGameMode = PlayGameMode(self)
    self.playGameMode.commands.append(LoadLevelCommand(self.playGameMode,fileName))
    try:
        self.playGameMode.update()
        self.currentActiveMode = 'Play'
    except Exception as ex:
        print(ex)
        self.playGameMode = None
        self.showMessage("Level loading failed :-(")
We call a method of the UserInterface rather than doing the job in the MenuGameMode class. It is because the required changes are beyond the scope of the MenuGameMode class. Its role is to manage a menu, and not to handle the game modes (which is the job of the UserInterface class).
Message game mode
The MessageGameMode class is the most basic "game" of the three. It only displays a message and waits for some keys to be pressed:
class MessageGameMode(GameMode):
    def __init__(self, ui, message):
        self.ui = ui
        self.font = pygame.font.Font("BD_Cartoon_Shout.ttf", 36)
        self.message = message

    def processInput(self):
        for event in pygame.event.get():
            if event.type == pygame.QUIT:
                self.ui.quitGame()
                break
            elif event.type == pygame.KEYDOWN:
                if event.key == pygame.K_ESCAPE \
                or event.key == pygame.K_SPACE \
                or event.key == pygame.K_RETURN:
                    self.ui.showMenu()

    def update(self):
        pass

    def render(self, window):
        surface = self.font.render(self.message, True, (200, 0, 0))
        x = (window.get_width() - surface.get_width()) // 2
        y = (window.get_height() - surface.get_height()) // 2
        window.blit(surface, (x, y))
Final code
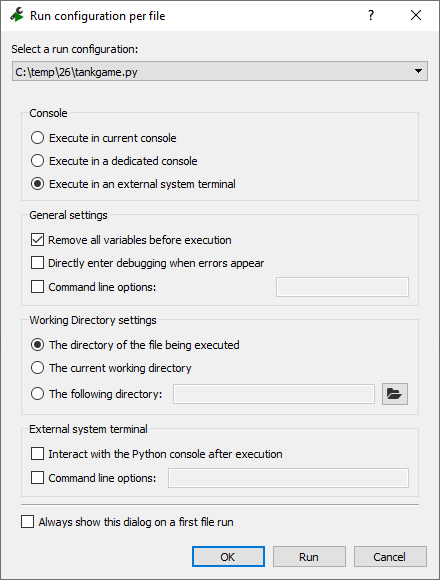
When running the program from Spyder, click the Run / Configuration per file menu item. In the Console group, select Execute in an external system terminal. In the General settings group, check Remove all variables before execution. Sometimes Pygame has trouble creating fonts, and these options can resolve the issue.
In the next post, we'll see how to add music and sounds!