
AWT GUI Facade (8): Keyboard and key sequences
In this post, I add the keyboard management to the facade, and I propose a way to detect key sequences. These sequences are used, for example, in games like Street Fighter II, where characters move according to specific key combos.
This post is part of the AWT GUI Facade series
Keyboard facade
I first design the keyboard facade. As I did for the mouse, I use a Factory Method pattern: I add a getKeyboard() method to the GUIFacade class that returns an instance of a Keyboard interface. This interface is defined as follow, and uses two other interfaces KeyEvent and KeyEventType:

The method isKeyPressed() returns true if the key corresponding to keyCode is pressed. The key codes are the ones defined in java.awt.event.KeyEvent, for instance java.awt.event.KeyEvent.VK_UP. It is part of the Java standard library, so they are always available, we don't need to create new ones. This method could be the only one in the Keyboard facade if we don't need to detect key sequences.
The three other methods of Keyboard and the two interfaces KeyEvent and KeyEventType are dedicated to the detection of key sequences. They assume that there is a buffer that holds a list of key events. The user can access this buffer thanks to the following methods:
- setMaxKeyEventLifeTime() defines the maximum lifetime of a key in the buffer (in nanoseconds). It means that key combos must happen in limited time; for instance for fast games, we can ask for combos succeeded in less than 200ms.
- getKeyEvents() returns the list of last key events. I show below examples of parsing of this list.
- clearKeyEvents() empties the event buffer. Once a key sequence is detected, we must remove it; otherwise, we will detect it at every game update.
The KeyEvent interface returns information about a key event: the key code with getKeyCode(), the event type with getType(), and the time when the event happens with getKeyTime(). The time is relative, it can only be used for comparison, for instance, for computing the delay between two key events.
Keyboard state
If we only need to know which key is currently pressed (or not), we only need the isKeyPressed() method of the Keyboard interface. For example, if we want to know the status of the arrow keys:
Keyboard keyboard = gui.getKeyboard(); # gui points to a GUIFacade
rightArrow = keyboard.isKeyPressed(java.awt.event.KeyEvent.VK_RIGHT);
leftArrow = keyboard.isKeyPressed(java.awt.event.KeyEvent.VK_LEFT);
upArrow = keyboard.isKeyPressed(java.awt.event.KeyEvent.VK_UP);
downArrow = keyboard.isKeyPressed(java.awt.event.KeyEvent.VK_DOWN);
This code should be put in the input handling part of the Game Loop pattern, for instance, the processInput() method I introduced in the mouse post.
Then, in the game update part of the Game Loop pattern, we can move a character:
if (rightArrow) {
    characterX += 1;
}
if (leftArrow) {
    characterX -= 1;
}
if (upArrow) {
    characterY -= 1;
}
if (downArrow) {
    characterX += 1;
}
Finally, in the rendering part of the Game Loop pattern, we draw the character:
gui.drawSprite(characterX,characterY,spriteId);I assume that drawSprite() is a method that draws the sprite spriteId at location (characterX, characterY).
With this approach, we can move a character at a speed that depends on several refresh rates (display, game state). It leads to many issues I'll address in future posts.
Detect key sequences
Now let me present how to detect key sequences using the Keyboard facade I propose. Let's start with a simple case, where we want to detect the press and then release of the right arrow:
boolean rightArrow = false;
List<KeyEvent> keyEvents = keyboard.getKeyEvents();
for (int i=0;i<keyEvents.size();i++) {
    if (i+1 < keyEvents.size()
     && keyEvents.get(i+0).getKeyCode() == java.awt.event.KeyEvent.VK_RIGHT
     && keyEvents.get(i+0).getType() == KeyEventType.KEY_PRESSED
     && keyEvents.get(i+1).getKeyCode() == java.awt.event.KeyEvent.VK_RIGHT
     && keyEvents.get(i+1).getType() == KeyEventType.KEY_RELEASED
            ) {
        rightArrow = true;
        keyboard.clearKeyEvents();
        break;
    }
}
The first line creates a boolean that becomes true if we detect the sequence. Line 2 gets the list of keyboard events. The for loop in lines 3-14 parses the list to find key sequences; in this example, only one sequence is searched. Lines 4 to 13 are the detection of our key sequence. It first checks that there is at least 2 key events from position i (line 4). Then, it checks that the event at position i is a pressed right arrow (lines 5-6). The two next lines do the same for a released right arrow at position i+1. If all conditions are met, the sequence is found and the rightArrow flag is set to true (line 10). The key event buffer is also emptied to prevent multiple detections of the same sequence.
Using the same principle, we can detect longer key sequences, for instance, if we want to detect press left, press right, release left, release right, we can add the following lines in the above for loop:
    ...
    if (i+3 < keyEvents.size()
     && keyEvents.get(i+0).getKeyCode() == java.awt.event.KeyEvent.VK_LEFT
     && keyEvents.get(i+0).getType() == KeyEventType.KEY_PRESSED
     && keyEvents.get(i+1).getKeyCode() == java.awt.event.KeyEvent.VK_RIGHT
     && keyEvents.get(i+1).getType() == KeyEventType.KEY_PRESSED
     && keyEvents.get(i+2).getKeyCode() == java.awt.event.KeyEvent.VK_LEFT
     && keyEvents.get(i+2).getType() == KeyEventType.KEY_RELEASED
     && keyEvents.get(i+3).getKeyCode() == java.awt.event.KeyEvent.VK_RIGHT
     && keyEvents.get(i+3).getType() == KeyEventType.KEY_RELEASED
            ) {
        combo1 = !combo1;
        keyboard.clearKeyEvents();
        break;
    }
    ...
If the sequence is detected, combo1 is switched: using this approach, you can enable/disable a feature, for instance, a cheat mode.
Move a character
We can use similar code lines to detect the press then release of each arrow key. Then, we have four flags that tell which arrow key was pressed then released: rightArrow, leftArrow, upArrow, and downArrow.
I also create four new attributes in my Game class: unitX, unitY, newUnitX, and newUnitY. The two first ones are the current position of my character in the world. The two last ones are what the keyboard commands. Using these two sets of coordinates is a very basic use of a command pattern: on the one hand we have the current state (unitX, uintY), and on the other hand, we have an objective, an order, a command represented by (newUnitX, newUnitY). I'll detail this further in future articles.
Right after the detection of key sequences in the processInput() method, I add the following lines to compute (newUnitX, newUnitY):
newUnitX = unitX;
newUnitY = unitY;
if (rightArrow) {
    newUnitX ++;
}
if (leftArrow) {
    newUnitX --;
}
if (downArrow) {
    newUnitY ++;
}
if (upArrow) {
    newUnitY --;
}
In the update() method of the Game Loop pattern, which is called at each game update, I process (newUnitX, newUnitY) to see if I can move the character to this new location:
if (newUnitX >= 0 && newUnitX < level.getWidth()
 && newUnitY >= 0 && newUnitY < level.getHeight()
 && level.getTileset(newUnitX, newUnitY) == 0) {
    Point p = level.getTile(newUnitX, newUnitY);
    if (p.y <= 1) {
        unitX = newUnitX;
        unitY = newUnitY;
    }
}
Lines 1-3 checks that the new coordinates are inside the map, and that the tile at this location is in the first tileset. The first tileset corresponds to the background, which means that I don't want my character to move in the foreground, where there are buildings and mountains. Line 4 gets the tile location in the texture. Line 5 checks that it is in the first two rows, where there are land tiles. If it is the case, I can move my character. Note that the use of rendering data (tile and tilesets) to execute character action is not robust. It is much better to create a separate game state: unfortunately, I can't present everything at the same time, it'll be the subject of future posts.
Draw the character
To draw the character, I first create a new layer in the init() method of the Game class:
...
unitsLayer = gui.createLayer();
unitsLayer.setTileSize(level.getTileWidth(),level.getTileHeight());
unitsLayer.setTexture("advancewars-tileset3.png");
unitsLayer.setSpriteCount(1);
...
It loads a new texture with unit sprites (soldiers, tanks, ...).
In the update() method, I update the rendering data of my character, as I did previously for the background and the foreground:
int tileWidth = level.getTileWidth();
int tileHeight = level.getTileHeight();
unitsLayer.setSpriteLocation(0, new Rectangle(scale*unitX*tileWidth, scale*unitY*tileHeight, scale*tileWidth, scale*tileHeight));
unitsLayer.setSpriteTexture(0, new Rectangle(new Point(1,0), new Dimension(1,1)));
In the render() method, I add the drawing if this new layer:
gui.drawLayer(unitsLayer);Debug text
To help to understand the key event detection, I added some text in the window:
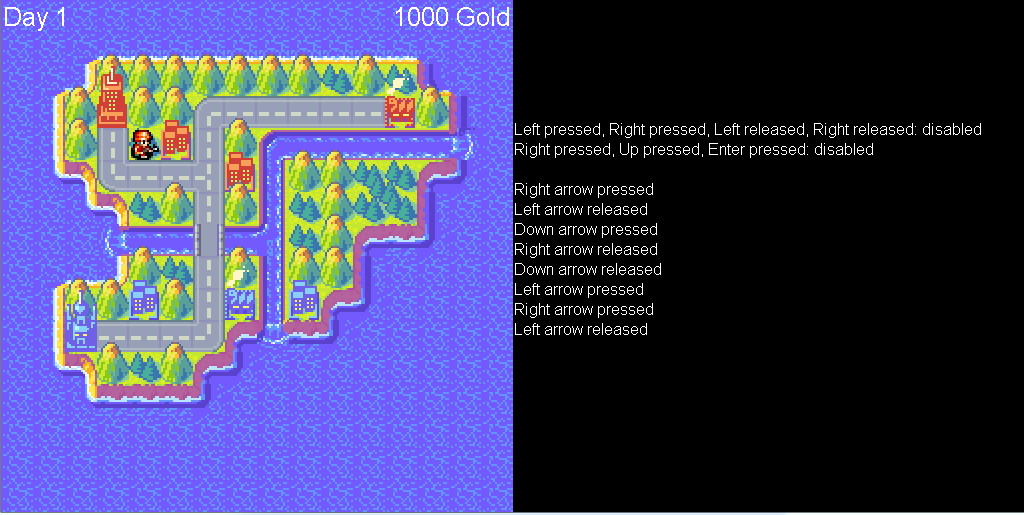
The two first lines show the state of two key combos. The list below these lines is the current state of the key event buffer. Download the code below and try it, it will help you to understand how it works. If you try the combos, be quick!
Summary
Most of my updates are in the Game class. These additions can be summed up in the following way:
class Game {
...
private Layer unitsLayer;
private int unitX, unitY, newUnitX, newUnitY;
private boolean combo1, combo2;

public void init() {
    ...
    Create unitsLayer
    ...
}

public void processInput() {
    ...
    Detect key sequences include combo1 and combo2
    Compute character new coordinates (newUnitX, newUnitY)
    ...
}

public void update() {
    ...
    Move character using new coordinates (newUnitX, newUnitY)
    Update character rendering data in unitsLayer
    ...
}

public void render() {
    ...
    Render unitsLayer
    ...
}

}
AWT Implementation
The AWT implementation has nothing special, you can read it here:
public class AWTKeyboard implements Keyboard, KeyListener {

    private final boolean[] keys;

    private final LinkedList<KeyEvent> keyEvents = new LinkedList();

    private long maxKeyEventLifeTime;

    public AWTKeyboard() {
        maxKeyEventLifeTime = (long)(3 * 1000000000.0);
        keys = new boolean[java.awt.event.KeyEvent.KEY_LAST + 1];
    }

    @Override
    public boolean isKeyPressed(int keyCode) {
        if (keyCode >= keys.length) {
            return false;
        }
        return keys[keyCode];
    }

    @Override
    public void setMaxKeyEventLifeTime(int time) {
        this.maxKeyEventLifeTime = time;
    }

    @Override
    public List<KeyEvent> getKeyEvents() {
        long now = System.nanoTime();
        Iterator<KeyEvent> iterator = keyEvents.iterator();
        while (iterator.hasNext()) {
            KeyEvent event = iterator.next();
            if ( (now - event.getKeyTime()) > maxKeyEventLifeTime ) {
                iterator.remove();
            }
        }
        return new ArrayList<>(keyEvents);
    }

    @Override
    public void clearKeyEvents() {
        keyEvents.clear();
    }

    @Override
    public void keyTyped(java.awt.event.KeyEvent e) {
    }

    @Override
    public void keyPressed(java.awt.event.KeyEvent e) {
        if (e.getKeyCode() < keys.length) {
            keys[e.getKeyCode()] = true;
        }
        keyEvents.add(new AWTKeyEvent(
            e.getKeyCode(),
            KeyEventType.KEY_PRESSED,
            System.nanoTime())
        );
    }

    @Override
    public void keyReleased(java.awt.event.KeyEvent e) {
        if (e.getKeyCode() < keys.length) {
            keys[e.getKeyCode()] = false;
        }
        keyEvents.add(new AWTKeyEvent(
            e.getKeyCode(),
            KeyEventType.KEY_RELEASED,
            System.nanoTime())
        );
    }

}
Download code
The code of this post can be downloaded here:
To compile: javac com/learngameprog/awtfacade08/Main.java
To run: java com.learngameprog.awtfacade08.Main