
OpenGL 2D Facade (1): Window and basic drawing
In this new series, I propose to create a GUI facade for 2D tileset-based games using OpenGL.
This post is part of the OpenGL 2D Facade series
A facade for OpenGL
Libraries like Pygame are relevant for discovering 2D graphics, but they used to be slow when you want to display many sprites on the screen. It is also challenging to create advanced effects. And even if one succeeds in this area, the result is likely to be extremely slow. Note that I am talking about the rendering part of these libraries. The other components, like input handling or audio output, are still relevant.
OpenGL allows the use of most of the power of a GPU card. It is not as powerful as DirectX and Vulkan, but for 2D games, it is more than enough! The drawback is that OpenGL is very complex to use, and has several significant constraints.
It is the reason why I propose to create a Facade. In a nutshell, this pattern creates a simplified and dedicated API of a library. In our case, we want to create a rendering API for 2D tileset-based games. This API is going to be easy to use. The implementation uses OpenGL to get fast rendering. This implementation is very technical, but since we focus on specific sub-cases, it will be easier to implement than a game that directly uses OpenGL.
In this series, I first describe the basics of OpenGL, to help you understand the way OpenGL works. After that, I start to create the facade. Then, I update it with new features using OpenGL.
Requirements
The examples of this series are in Python language, but the principles are the same for all other ones. For all programming languages, Python included, there are bindings to the OpenGL API. The names of the functions are the same in each case. As a result, if you need to translate to another language, you only need to update the syntax. Function calls and parameter values are the same.
If you don't already have Python installed, I recommend Anaconda 3 for the Python environment: anaconda.com/products/individual. For editing, I recommend Pycharm: jetbrains.com/pycharm/promo/anaconda.
Once Anaconda is installed, open an Anaconda Prompt. If you have Windows, search "Anaconda Prompt" in the start menu. Then, create an environment with Python 3.7:
conda create --name gl2dfacade python=3.7.7I show the version I used to test the program of this series to be sure that you can run them successfully. With more recent versions, maybe it won't work.
Activate this new environment:
conda activate gl2dfacadeInstall the following packages with pip:
pip install pygame==1.9.6 PyOpenGL==3.1.5 PyOpenGL_accelerate==3.1.5 numpy==1.18.5 Pillow==7.1.2 tmx==1.10 - Pygame is used to create a window and handle inputs (keyboard, mouse, ...);
- PyOpenGL contains the OpenGL bindings;
- PyOpengl_accelerate is optional and speed up some procedures;
- numpy allows the creation and computation of tensors;
- Pillow can read and save image files;
- tmx can read levels created with Tiled Map Editor.
Create a window
Let's start with a short program that creates and handle a window using Pygame:
import os
import pygame

os.environ['SDL_VIDEO_CENTERED'] = '1'
windowSize = (1280, 800)
pygame.display.set_mode(windowSize, pygame.DOUBLEBUF | pygame.OPENGL)

clock = pygame.time.Clock()
running = True
while running:
    for event in pygame.event.get():
        if event.type == pygame.QUIT:
            running = False
            break
        elif event.type == pygame.KEYDOWN:
            if event.key == pygame.K_ESCAPE:
                running = False
                break

    pygame.display.flip()
    clock.tick(60)

pygame.quit()
quit()
Lines 1-2 import os (a standard Python library) and Pygame.
Line 4 sets an environment variable to get a centered window upon creation. If you remove this line, the window may appear anywhere on the screen.
The option pygame.DOUBLEBUF enables double buffering. It means that there are always two frame buffers: one displayed on the screen while the other is rendered. Using this approach, rendering and display can run in parallel. The only drawback (it if is one) is that we must redraw the whole frame every time.
The option pygame.OPENGL creates an OpenGL context. It is mandatory to use OpenGL.
Lines 5-6 create a window with a resolution of 1280 per 800 pixels. Note that it is the resolution of the rendering area, the window size is larger considering the window bar etc. In the following, we always ignore all the window decorations and focus on the rendering area.
Line 8 creates a clock to limit the frame rate.
Lines 9-21 is the main loop; it continues until running is False.
Lines 11-18 handle Pygame events. We consider two cases: the QUIT event (for instance, when the user closes the window) and the pressing of the escape key. In both cases, running is set to False, and the loop stops.
Line 20 swaps the two frame buffers.
Line 21 limits the frame rate to 60 times per second.
Draw rectangles
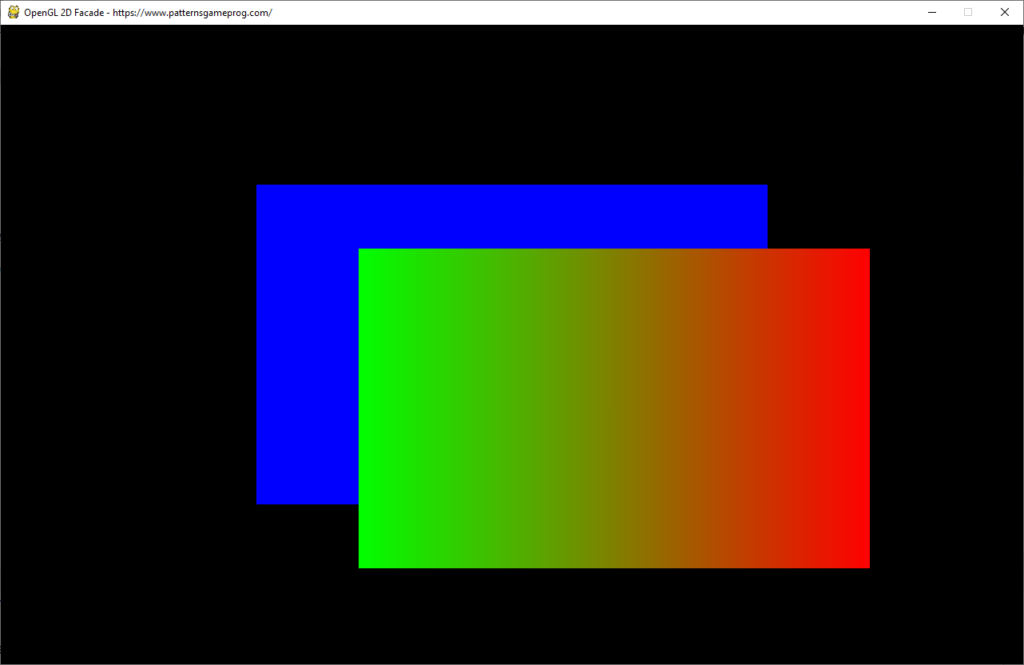
Let's update this first program to display two rectangles:
Clear the background
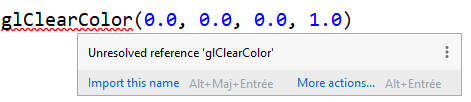
To get a black background, we define its colors using the glClearColor function:
glClearColor(0.0, 0.0, 0.0, 1.0)This line should go after the creation of the window and before the main loop. We must import this function from OpenGL.GL:
from OpenGL.GL import glClearColorWith PyCharm, you can easily create these import using the context menu:
You can import all functions using from OpenGL.GL import *. Wildcard imports are not recommended, it is up to you!
Inside the main loop, after the event handling, and before the frame swapping, add the following line the clear the background:
glClear(GL_COLOR_BUFFER_BIT)Draw quads
If we want to draw a primitive, like triangles or rectangles, we have to set OpenGL in a specific state. For instance, for rectangles, we set the quads state:
glBegin(GL_QUADS)OpenGL is a state machine: each operation depends on its current state.
Before defining the vertices of the rectangle, we have to define their color. For instance, for blue color:
glColor3f(0.0, 0.0, 1.0) # BlueColors in OpenGL are red, green, and blue values between 0 and 1.
Then, we can define the edges of the rectangle with the glVertex2f() function:
glVertex2f(-0.5, -0.5)
glVertex2f(-0.5, 0.5)
glVertex2f(0.5, 0.5)
glVertex2f(0.5, -0.5)
The coordinates system of the screen in OpenGL is always with x and y values between -1 and 1:
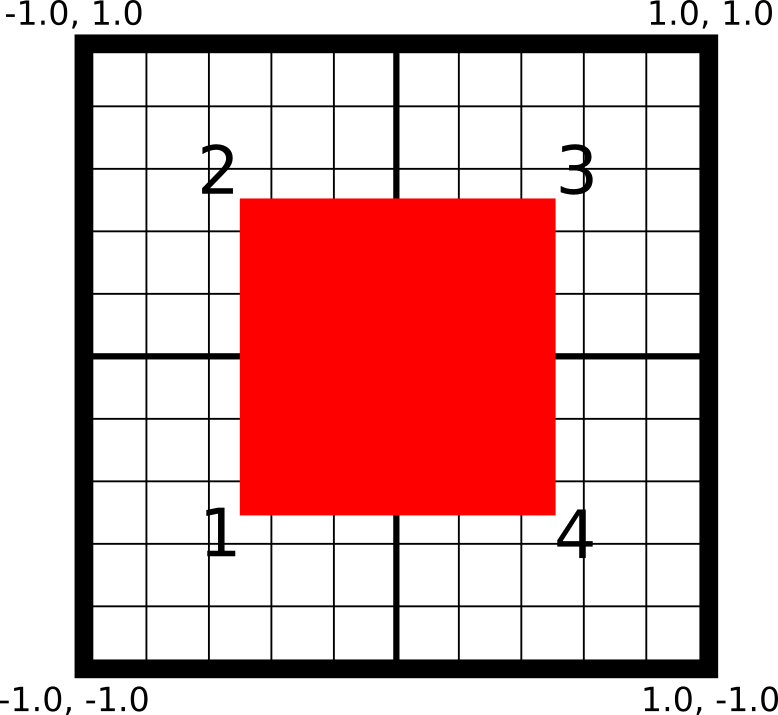
In this example, the first vertex is the bottom left one with coordinates -0.5, -0.5. The second one is the top left one with coordinates -0.5, 0.5, and so on.
These coordinates do not depend on the resolution. If you change the window resolution, and rerun the program, the window is smaller, but the rendering is the same: there are rectangles in the middle. If you change the aspect ratio (width versus height) of the window, the rectangles are stretched accordingly.
Colors are per vertex, so if we change the current color with glColor3f(), it sets the colors for the following vertices. In this example, we create a second rectangle where the two first vertices are green and the two last ones red:
glColor3f(0.0, 1.0, 0.0)  # Green
glVertex2f(-0.3, -0.7)
glVertex2f(-0.3, 0.3)
glColor3f(1.0, 0.0, 0.0)  # Red
glVertex2f(0.7, 0.3)
glVertex2f(0.7, -0.7)
We end the quads state with the glEnd() function that ends any state began with glBegin():
glEnd()Finally, we make sure that all our commands and sent to the GPU before swapping the frame buffer:
glFlush()Final program
You can find the whole program here:
import os
import pygame
from OpenGL.GL import glClear, GL_COLOR_BUFFER_BIT, glBegin, GL_QUADS, glEnd, glColor3f, glVertex2f, glFlush, \
    glClearColor

os.environ['SDL_VIDEO_CENTERED'] = '1'
windowSize = (1280, 800)
pygame.display.set_mode(windowSize, pygame.DOUBLEBUF | pygame.OPENGL)
pygame.display.set_caption("OpenGL 2D Facade - https://www.patternsgameprog.com/")

glClearColor(0.0, 0.0, 0.0, 1.0)

clock = pygame.time.Clock()
running = True
while running:
    for event in pygame.event.get():
        if event.type == pygame.QUIT:
            running = False
            break
        elif event.type == pygame.KEYDOWN:
            if event.key == pygame.K_ESCAPE:
                running = False
                break

    glClear(GL_COLOR_BUFFER_BIT)

    glBegin(GL_QUADS)

    glColor3f(0.0, 0.0, 1.0)  # Blue
    glVertex2f(-0.5, -0.5)
    glVertex2f(-0.5, 0.5)
    glVertex2f(0.5, 0.5)
    glVertex2f(0.5, -0.5)

    glColor3f(0.0, 1.0, 0.0)  # Green
    glVertex2f(-0.3, -0.7)
    glVertex2f(-0.3, 0.3)
    glColor3f(1.0, 0.0, 0.0)  # Red
    glVertex2f(0.7, 0.3)
    glVertex2f(0.7, -0.7)

    glEnd()

    glFlush()

    pygame.display.flip()
    clock.tick(60)

pygame.quit()
quit()
In the next post, I'll show how to create mesh data using the numpy library.