
OpenGL 2D Facade (13): Text
In this post, I start to address a more advanced topic: text rendering with OpenGL. I first consider a simple case with monospaced fonts and small character sets.
This post is part of the OpenGL 2D Facade series
Objective
To test this new feature, I propose to draw text over the other layers. I update the text regularly, so we can check that we support dynamic text rendering:
Approach
For this first post on text rendering, implementation is as simple as possible. We only consider monospaced fonts: all characters have the same width and height. Thanks to this property, we can create tiles with the same size for all characters.
Furthermore, we only consider a small character set, such that all characters fit into a tileset of reasonable size. In the example program, we use English characters and usual symbols, but you can easily do the same with any other small set of characters.
For instance, with the basis33 font and a tile height of 64 pixels, we generate the following tileset:
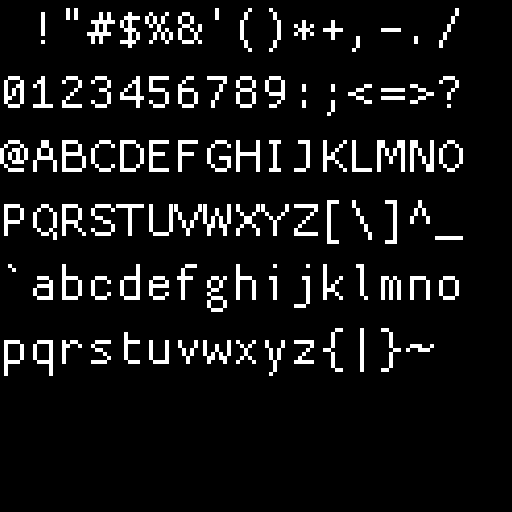
Tristan Grimmer created the basis33 font. You can download it here: 1001fonts.com/basis33-font.html.
Note: I selected a pixelized font to stay in a pixel-based style, but if you replace it with a usual TrueType font, you'll get a high definition rendering.
We create character tiles for a given height (64 pixels in the above example). It is not the height of characters; it is larger and includes spaces to align characters.
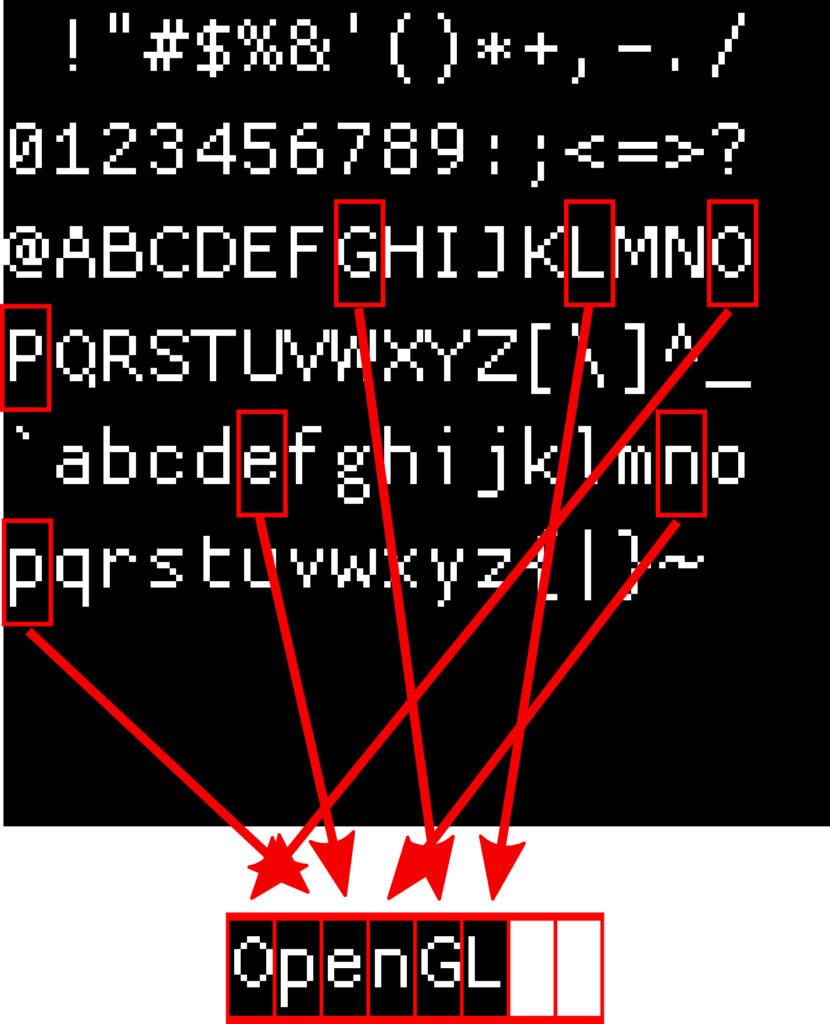
We create a mesh where each quad corresponds to a character. We put the first character/quad at some location, and then the following one on its right, and so on. In the following diagram, we render "OpenGL" using eight quads, where the six first ones use character tiles, and the two last ones use the transparent tile:
Facade with text layers
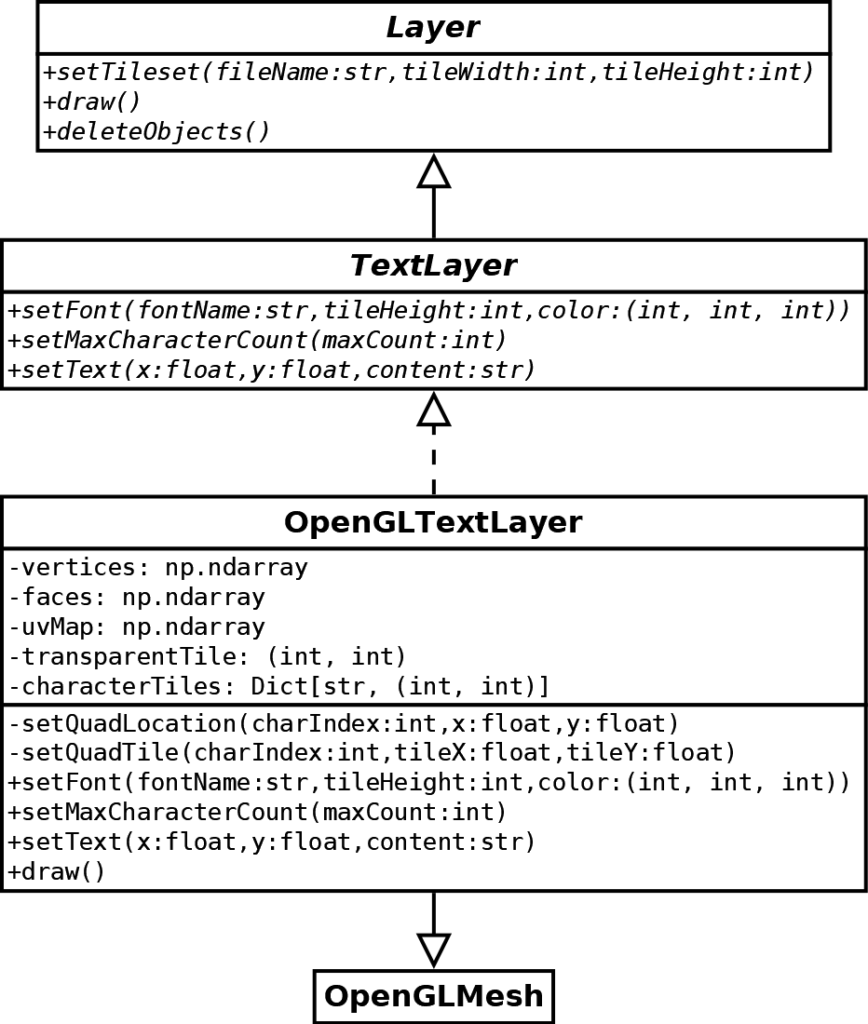
We add a new TextLayer class to the facade:
The creation of text layers is thanks to a new createTextLayer() method in the GUIFacade class, as for the grid and characters layers.
As you can see in the diagram above, we also base this layer on the GLMesh class. Consequently, it contains a list of quads with a location and a tile.
The text layer is similar to the characters layer since we want to draw quads in any location. As a result, there are two methods setQuadLocation() and setQuadTile() that set the location and tile of a quad. The only difference is that the setQuadLocation()method locates a quad on a pixel, and not on a grid cell. It means that round values of (x, y) coordinates correspond to a pixel and not to a grid cell.
We will locate all UI-related components on pixels since there is no grid in menus, icons, life bars, etc. Note that, in all cases, we can render components anywhere since the coordinates are float values; the meaning of round values is a convenience.
The characterTiles attribute maps characters to tile coordinates in the tileset. For instance, the following line gets the tile coordinates for the "A" character:
x, y = self.__characterTiles["A"]We initialize this map in the setFont() method.
Create the texture
The setFont() method
The setFont() generate the tileset for a given font, tile height and color:
def setFont(self, fontName: str, tileHeight: int, color: (int, int, int)):
    characters = [
        " !\"#$%&'()*+,-./",
        "0123456789:;<=>?",
        "@ABCDEFGHIJKLMNO",
        "PQRSTUVWXYZ[\\]^_",
        "`abcdefghijklmno",
        "pqrstuvwxyz{|}~ ",
    ]
    charactersPerRow = 16
    rowCount = len(characters)

    # Render a single character to find the required tile height
    fontSize = int(tileHeight * 1.3)
    for iterations in range(100):  # Up to 100 tries
        font = pygame.font.Font(fontName, fontSize)
        surface = font.render("M", False, color)
        if surface.get_height() == tileHeight:
            break
        elif surface.get_height() > tileHeight:
            fontSize -= 1
        else:
            fontSize += 1
    tileWidth = surface.get_width()
    tileHeight = surface.get_height()

    # Create a square image with width and height equal to a power of two
    def nextPowerOfTwo(x: int) -> int:
        return 1 if x == 0 else 2 ** (x - 1).bit_length()
    imageWidth = nextPowerOfTwo(charactersPerRow * tileWidth)
    imageHeight = nextPowerOfTwo(rowCount * tileHeight)
    imageSize = max(imageWidth, imageHeight)
    image = pygame.Surface((imageSize, imageSize), flags=pygame.SRCALPHA)

    self.__characterTiles = {}
    for rowIndex in range(rowCount):
        for colIndex, character in enumerate(characters[rowIndex]):
            # Render and blit the character
            surface = font.render(character, False, color)
            if surface.get_width() > tileWidth:
                logging.warning("Character {} larger width {} > {}".format(character, surface.get_width(), tileWidth))
            image.blit(surface, (colIndex * tileWidth, rowIndex * tileHeight))
            # Compute the tile location for each character in the row
            self.__characterTiles[character] = (colIndex, rowIndex)

    # Set transparent tile on space
    self.__transparentTile = self.__characterTiles[" "]

    # Convert to numpy array
    imageArray = np.zeros((imageSize, imageSize, 4), dtype=np.uint8)
    imageArray[..., 0] = pygame.surfarray.pixels_red(image)
    imageArray[..., 1] = pygame.surfarray.pixels_green(image)
    imageArray[..., 2] = pygame.surfarray.pixels_blue(image)
    imageArray[..., 3] = pygame.surfarray.pixels_alpha(image)
    imageArray = imageArray.transpose((1, 0, 2))

    # Send the tileset to the GPU
    self.setTileset(imageArray, tileWidth, tileHeight)
Define the character set
Lines 2-11 in the setFont() method define all the characters to generate:
characters = [
    " !\"#$%&'()*+,-./",
    "0123456789:;<=>?",
    "@ABCDEFGHIJKLMNO",
    "PQRSTUVWXYZ[\\]^_",
    "`abcdefghijklmno",
    "pqrstuvwxyz{|}~ ",
]
charactersPerRow = 16
rowCount = len(characters)
Each string in the characters list is a row in the tileset.
Find the right font size
Lines 14-25 in the setFont() method try to find the font size that leads to tiles of a given height:
fontSize = int(tileHeight * 1.3)
for iterations in range(100):  # Up to 100 tries
    font = pygame.font.Font(fontName, fontSize)
    surface = font.render("M", False, color)
    if surface.get_height() == tileHeight:
        break
    elif surface.get_height() > tileHeight:
        fontSize -= 1
    else:
        fontSize += 1
tileWidth = surface.get_width()
tileHeight = surface.get_height()
According to the Pygame documentation, the pygame.font.Font.render() method should render characters of a given height. In practice, it was not the case for all fonts.
The loop repeats a font creation with some size (line 3) and renders a character (line 4). The result is a Pygame surface with the size of a tile. If we found the right height (line 5), then we can stop the loop (line 6). Otherwise, depending on cases, we increase or decrease the font size (lines 5-10).
Note that we render an "M" because it is usually a large character. Consequently, we can see the surface size as the maximum tile size (lines 11-12). It could look strange to look for the maximum tile size with monospaced fonts: all characters should render with the same size. However, in practice, some characters can be smaller, don't ask me why!
Create the tileset surface
Lines 28-33 in the setFont() method create a Pygame surface where we draw all characters:
def nextPowerOfTwo(x: int) -> int:
    return 1 if x == 0 else 2 ** (x - 1).bit_length()
imageWidth = nextPowerOfTwo(charactersPerRow * tileWidth)
imageHeight = nextPowerOfTwo(rowCount * tileHeight)
imageSize = max(imageWidth, imageHeight)
image = pygame.Surface((imageSize, imageSize), flags=pygame.SRCALPHA)
GPUs prefer square texture size with a power of two: these lines computes the best size with this property.
Line 3 computes the smallest power of two that contains all characters in one row.
Line 4 computes the smallest power of two that contains all character rows.
Line 5 selects the largest width/height to get a square.
Line 6 creates the Pygame surface with an alpha channel.
Render characters
Lines 28-33 in the setFont() method render all the characters and initialize the map:
self.__characterTiles = {}
for rowIndex in range(rowCount):
    for colIndex, character in enumerate(characters[rowIndex]):
        # Render and blit the character
        surface = font.render(character, False, color)
        if surface.get_width() > tileWidth:
            logging.warning("Character {} larger width {} > {}".format(character, surface.get_width(), tileWidth))
        image.blit(surface, (colIndex * tileWidth, rowIndex * tileHeight))
        # Compute the tile location for each character in the row
        self.__characterTiles[character] = (colIndex, rowIndex)
We iterate through all locations in the tileset (lines 2-3). We render a character from the set (line 5) and display a warning if it is larger (lines 6-7). It should not happen, but if it is the case, we know it and can choose another font. Then, we draw the surface with the character in the tileset surface (line 8). Finally, we save the tile coordinates for the current character (line 10).
Create the texture
The end of the method converts the Pygame surface into a Numpy array, transposes the image (cf. previous posts on Numpy indexing), and send it to the GPU:
# Convert to numpy array
imageArray = np.zeros((imageSize, imageSize, 4), dtype=np.uint8)
imageArray[..., 0] = pygame.surfarray.pixels_red(image)
imageArray[..., 1] = pygame.surfarray.pixels_green(image)
imageArray[..., 2] = pygame.surfarray.pixels_blue(image)
imageArray[..., 3] = pygame.surfarray.pixels_alpha(image)
imageArray = imageArray.transpose((1, 0, 2))

# Send the tileset to the GPU
self.setTileset(imageArray, tileWidth, tileHeight)
Initialize the mesh
We initialize the mesh in the setMaxCharacterCount() method:
def setMaxCharacterCount(self, maxCount: int):
    if self.__vertices is not None:
        raise RuntimeError("Update of max character count is not supported")

    self.__vertices = np.empty([maxCount, 4, 2], dtype=np.float32)
    self.__uvMap = np.empty([maxCount, 4, 2], dtype=np.float32)
    self.__faces = np.empty([maxCount, 4], dtype=np.uint)
    faceCount = 0
    for quadIndex in range(maxCount):
        self.__setQuadLocation(quadIndex, 0, 0)
        self.__setQuadTile(quadIndex, self.__transparentTile[0], self.__transparentTile[1])

        self.__faces[quadIndex, 0] = faceCount * 4
        self.__faces[quadIndex, 1] = faceCount * 4 + 1
        self.__faces[quadIndex, 2] = faceCount * 4 + 2
        self.__faces[quadIndex, 3] = faceCount * 4 + 3
        faceCount += 1

    self.setData(self.__vertices, self.__faces, self.__uvMap, dynamic=True)
It is similar to the setCharacterCount() in the characters layer: we create many quad with a transparent tile.
Update the mesh to get a text rendering
The setText() method updates the mesh to get the rendered text:
def setText(self, x: float, y: float, content: str):
    if len(content) > self.maxCharacterCount:
        content = content[0:self.maxCharacterCount]

    x0 = x
    # Characters to display
    for charIndex, character in enumerate(content):
        if character == "\n":
            x = x0
            y += self.tileHeight
            continue
        if character in self.__characterTiles:
            tileCoords = self.__characterTiles[character]
        else:
            tileCoords = self.__characterTiles["?"]
        self.__setQuadTile(charIndex, tileCoords[0], tileCoords[1])
        self.__setQuadLocation(charIndex, x, y)
        x += self.tileWidth

    # Remaining characters are transparent
    for charIndex in range(len(content), self.maxCharacterCount):
        self.__setQuadTile(charIndex, self.__transparentTile[0], self.__transparentTile[1])
Lines 2-3 cut the text if it is too large: this is still better than a crash!
The first loop sets the first quads (lines 7-18). If the character is a carriage return, then we reset x and increase y, so that the next quads are on the line following the current one (lines 8-11). If the character is in the tileset, then tile coordinates are the ones from the map; otherwise, we use the question mark tile (lines 12-15). Finally, we set the tile and coordinates of the current quad and increase x (lines 16-18).
The second loop ensures that all the remaining quads have a transparent tile (lines 20-22).
Example usage
In the main program, we create a new text layer and define a text to render:
textLayer = guiFacade.createTextLayer()
textLayer.setFont("assets/font/basis33.ttf", 64, (255, 255, 255))
textLayer.setMaxCharacterCount(100)
message = "Text with OpenGL\nOpenGL 2D Facade\nhttp://patternsgameprog.com"
messageCurrentIndex = 0
In the main game loop, we update the text layer every three frames:
if (frameCount % 3) == 0:
    textLayer.setText(4 * 32, 12 * 32, message[0:messageCurrentIndex])
    messageCurrentIndex += 1
    if messageCurrentIndex >= len(message) + 50:
        messageCurrentIndex = 0
We update the text every three frames to get a slower update; you can change this rate if you want.
We set the text content to the messageCurrentIndex first characters in message. When we have drawn all the characters (plus some delay) we reset.
Final program
In the next post, we'll see how to handle large character sets like unicode or UTF8.