
OpenGL 2D Facade (16): Text renderers
Before going to text with mixed styles, we need a better solution to render characters. In this post, I propose an approach based on the Composite pattern that allows an effortless combination of text styles.
This post is part of the OpenGL 2D Facade series
Objective
Thanks to this new model, we can easily create new combinations of text styles:
Proposed approach
Previous approach
With the previous approach, we handle the combination in a single method using branching:
if shadow:
   if underline:
      if outline:
      else:
        ...
   else:
     ...
else:
   if underline:
      if outline:
      else:
        ...
   else:
     ...
As the number of styles grows, it leads to many cases we have to implement manually. There is a lot of duplicated code and as much risk of errors.
Composite approach
I propose an approach based on the Composite pattern to create our combinations:
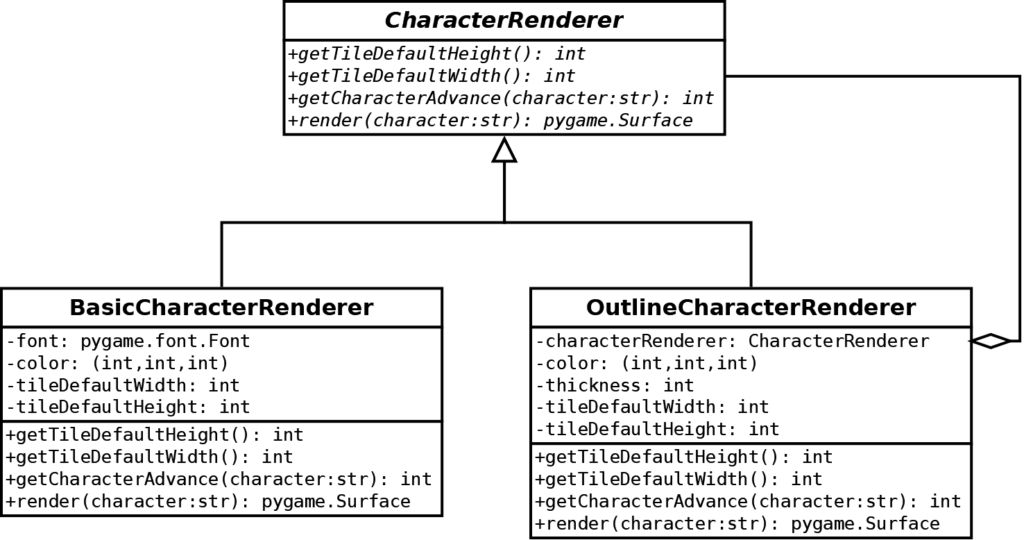
The CharacterRenderer abstract class is the base class for all our renderers. Each character renderer can render a character using the render() method. The user of these renderers can also get metric values thanks to the getTileDefaultWidth(), getTileDefaultHeight()and getCharacterAdvance() method.
The two other classes are two use cases.
The BasicCharacterRenderer is an independent renderer that can render characters by itself. It uses the Pygame font utilities to create a surface for any character. Since these tools can handle bold and italic styles, this class can also handle them.
The OutlineCharacterRenderer illustrates the magic of this approach. It uses another character renderer and adds an effect on top of it. In the outline case, it renders a character with the other renderer and outlines it. Since the other renderer can be any renderer, we can outline any combination of styles.
Factory
The approach I propose is complete with a factory that can create all the renderers:
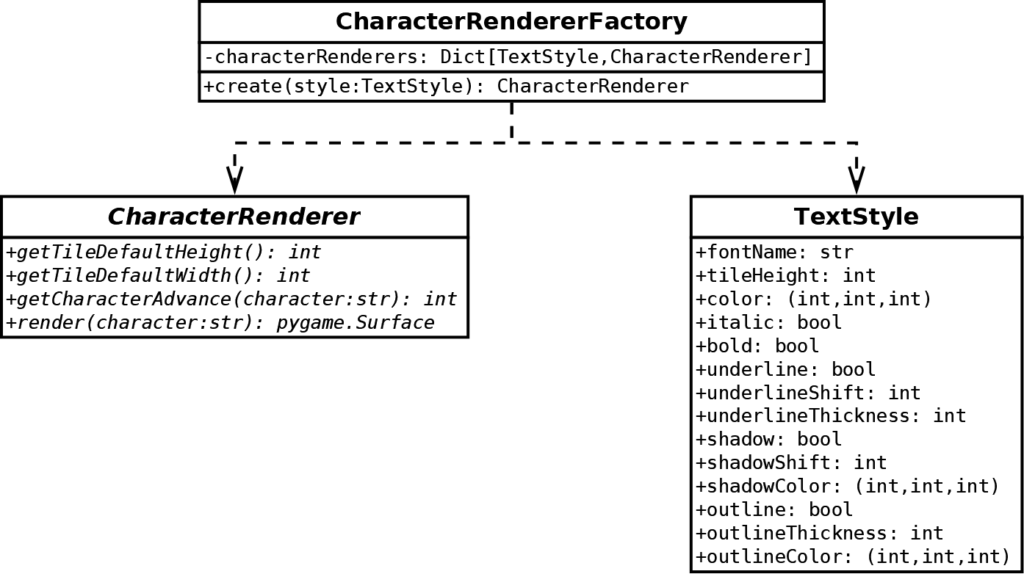
First of all, let's have a look at the TextStyle class. Each instance of this class represents a specific combination of styles. It eases the creation of new renderers: rather than creating constructors with many arguments or many methods in each renderer, we only need to give an instance of this class. It also eases the creation of a renderer cache since we can identify any combination with this class's instances.
The CharacterRendererFactory class is an implementation of the Flyweight pattern. Note that, despite the "Factory" word in the name, it is not implementing the Factory Method or Abstract Factory patterns since there are no dynamics in the instantiation process. We could need factory patterns with themes, where some global properties can model each text style. As a result, I propose to use the "Factory" in the name just in case. Factory pattern or not, it is the same for the user: she/he is looking for character renderers given styles, whatever we cache them, or change them according to a theme.
In the TextTileSet class, where we create a tileset for a given style, we no more need a setFont() method, but a new setStyle()method. It asks the factory for a new character renderer:
class TextTileset:

    ...

    def setStyle(self, style: TextStyle):
        self.__characterRenderer = self.__characterRendererFactory.create(style)
        self.__characterTiles = {}
        self.__resize(256, 256)

   ...
We also no more need the renderCharacter() private method and only have to call the render() method of the character renderer:
surface = self.__characterRenderer.render(character)Similarly, we call the getTileHeight() and getCharacterAdvance() of the character renderer when needed.
As you can see, the introduction of these character renderers and factory simplify a lot this procedure.
Implementation of renderers
Basic character renderer
This renderer handles plain, italic, and bold styles thanks to a Pygame font:
class BasicCharacterRenderer(CharacterRenderer):

    def __init__(self, style: TextStyle):
        fontSize = int(style.tileHeight * 1.3)
        for iterations in range(100):
            font = pygame.font.Font(style.fontName, fontSize)
            if style.flags & TextStyle.ITALIC:
                font.set_italic(True)
            if style.flags & TextStyle.BOLD:
                font.set_bold(True)
            surface = font.render("M", False, style.color)
            if surface.get_height() == style.tileHeight:
                break
            elif surface.get_height() > style.tileHeight:
                fontSize -= 1
            else:
                fontSize += 1
        self.__font = font
        self.__color = style.color
        self.__tileDefaultWidth = surface.get_width()  # type: int
        self.__tileDefaultHeight = surface.get_height()  # type: int

    @property
    def tileDefaultWidth(self) -> int:
        return self.__tileDefaultWidth

    @property
    def tileDefaultHeight(self) -> int:
        return self.__tileDefaultHeight

    def getCharacterAdvance(self, character: str) -> int:
        metrics = self.__font.metrics(character)
        return metrics[0][4]

    def render(self, character: str) -> pygame.Surface:
        return self.__font.render(character, False, self.__color)
The constructor (lines 3-21) looks for the font size that leads to the desired tile height (lines 4-17). It also handles the bold and italic styles since Pygame font can do that (lines 7-10).
The default tile size, as returned by the tileDefaultWidth and tileDefaultHeight depends on the size of the rendering of an "M" character.
The character advance is as returned by the metrics of the Pygame font (lines 31-33).
The rendering is the one returned by the Pygame font (lines 35-36).
Underline
The UnderlineCharacterRenderer class handles the underline style:
class UnderlineCharacterRenderer(CharacterRenderer):

    def __init__(self, style: TextStyle, characterRenderer: CharacterRenderer):
        self.__characterRenderer = characterRenderer
        self.__color = style.color
        self.__underlineShift = style.underlineShift
        self.__underlineThickness = style.underlineThickness

    @property
    def tileDefaultWidth(self) -> int:
        return self.__characterRenderer.tileDefaultWidth

    @property
    def tileDefaultHeight(self) -> int:
        return self.__characterRenderer.tileDefaultHeight

    def getCharacterAdvance(self, character: str) -> int:
        return self.__characterRenderer.getCharacterAdvance(character)

    def render(self, text: str) -> pygame.Surface:
        surface = self.__characterRenderer.render(text)

        width = surface.get_width()
        start = (0, self.__underlineShift)
        end = (width - 1, self.__underlineShift)
        pygame.draw.line(surface, self.__color, start, end, self.__underlineThickness)

        return surface
It is based on another character renderer, so we have to provide one when constructing it (line 3). We need properties for the line to draw: a color (line 5), a shift value (line 6), and a thickness(line 7).
The metrics are the same as the base character renderer, so we call it to get them (lines 9-18).
For the rendering, we first render the character (line 21). Then, we draw a line given the current parameter values (lines 23-26). Finally, we return the surface with the character and the line (line 28).
Outline
We also base the OutlineCharacterRenderer class on another renderer:
class OutlineCharacterRenderer(CharacterRenderer):

    def __init__(self, style: TextStyle, characterRenderer: CharacterRenderer):
        self.__color = style.outlineColor
        self.__thickness = style.outlineThickness
        self.__characterRenderer = characterRenderer

    @property
    def tileDefaultWidth(self) -> int:
        return self.__characterRenderer.tileDefaultWidth + 2 * self.__thickness

    @property
    def tileDefaultHeight(self) -> int:
        return self.__characterRenderer.tileDefaultHeight + 2 * self.__thickness

    def getCharacterAdvance(self, character: str) -> int:
        return self.__characterRenderer.getCharacterAdvance(character) + 2 * self.__thickness

    def render(self, text: str) -> pygame.Surface:
        surface = self.__characterRenderer.render(text)

        # Create a larger surface
        size = (surface.get_width() + 2 * self.__thickness, surface.get_height() + 2 * self.__thickness)
        outlineSurface = pygame.Surface(size, flags=pygame.SRCALPHA)

        # Blit the character
        outlineSurface.blit(surface, (self.__thickness, self.__thickness))

        # Draw the outline
        outlineColor = self.__color + (255,)
        array = surface2numpy(outlineSurface)
        for step in range(self.__thickness):
            array = outlineStep(array, outlineColor)
        outlineSurface = numpy2surface(array)

        return outlineSurface
Metrics also depend on the base renderer, except that we have to increase them because of the thickness (lines 8-17). Every thickness point adds a pixel to the left, the right, the top, and the bottom. Consequently, horizontal metrics increase by twice the thickness, and similarly for vertical metrics.
For the rendering, we create a larger surface (lines 23-24), draw the character in the center of this new surface (line 27), and finally draw the outline (lines 30-34).
I optimized the outlining process thanks to Numpy arrays. Operations on these arrays are much faster than Python manual for loops on each pixel. On my computer, I got a 50x speedup for a tile height of 64 pixels. The trick is to create a mask that defines what pixels we should light with the outline color:
def outlineStep(array: np.ndarray, outlineColor: (int, int, int, int)) -> np.ndarray:
    array = array.copy()
    alpha = array[..., 3]
    mask = shiftXY(alpha, 1, 0) | shiftXY(alpha, -1, 0)
    mask |= shiftXY(alpha, 0, 1) | shiftXY(alpha, 0, -1)
    mask |= shiftXY(alpha, -1, -1) | shiftXY(alpha, 1, 1)
    mask |= shiftXY(alpha, -1, 1) | shiftXY(alpha, 1, -1)
    mask &= ~alpha
    array[mask != 0] = outlineColor
    return array
The shiftXY() function shift an image by some pixels in X and Y direction. For instance, shiftXY(alpha, 1, -1) shifts by one pixel to the right and one pixel to the top:
def shiftXY(array: np.ndarray, directionX: int, directionY: int) -> np.ndarray:
    result = np.empty_like(array)
    height = result.shape[0]
    width = result.shape[1]

    if directionX > 0:
        inputRangeX = slice(directionX, width)
        outputRangeX = slice(0, width - directionX)
        fillRangeX = slice(width - directionX, width)
    elif directionX < 0:
        directionX = -directionX
        inputRangeX = slice(0, width - directionX)
        outputRangeX = slice(directionX, width)
        fillRangeX = slice(0, directionX)
    else:
        inputRangeX = slice(None)
        outputRangeX = slice(None)
        fillRangeX = None

    if directionY > 0:
        inputRangeY = slice(directionY, height)
        outputRangeY = slice(0, height - directionY)
        fillRangeY = slice(height - directionY, height)
    elif directionY < 0:
        directionY = -directionY
        inputRangeY = slice(0, height - directionY)
        outputRangeY = slice(directionY, height)
        fillRangeY = slice(0, directionY)
    else:
        inputRangeY = slice(None)
        outputRangeY = slice(None)
        fillRangeY = None

    result[outputRangeY, outputRangeX] = array[inputRangeY, inputRangeX]
    if fillRangeY is not None:
        result[fillRangeY, :] = 0
    if fillRangeX is not None:
        result[:, fillRangeX] = 0
    return result
Shadow
The ShadowCharacterRenderer class uses two character renderer: one for the front and the other for the shadow:
class ShadowCharacterRenderer(CharacterRenderer):

    def __init__(self, style: TextStyle, characterRenderer: CharacterRenderer, shadowCharacterRenderer: CharacterRenderer):
        self.__shadowShift = style.shadowShift
        self.__characterRenderer = characterRenderer
        self.__shadowCharacterRenderer = shadowCharacterRenderer

    @property
    def tileDefaultWidth(self) -> int:
        return self.__characterRenderer.tileDefaultWidth + self.__shadowShift

    @property
    def tileDefaultHeight(self) -> int:
        return self.__characterRenderer.tileDefaultHeight + self.__shadowShift

    def getCharacterAdvance(self, character: str) -> int:
        return self.__characterRenderer.getCharacterAdvance(character)

    def render(self, text: str) -> pygame.Surface:
        surface = self.__characterRenderer.render(text)
        surface2 = self.__shadowCharacterRenderer.render(text)

        # Create a larger surface
        shift = self.__shadowShift
        size = (surface.get_width() + shift, surface.get_height() + shift)
        shadowedSurface = pygame.Surface(size, flags=pygame.SRCALPHA)

        # Blit the shadow and the character
        shadowedSurface.blit(surface2, (shift, shift))
        shadowedSurface.blit(surface, (0, 0))

        return shadowedSurface
As in the previous case, we update the metrics according to the shadow shift (lines 8-17).
For the rendering, we first render the front and shadow characters (lines 20-21). Then, we create a larger surface (lines 24-26). Finally, we blit the two characters in this larger surface (lines 29-30).
Implementation of the Factory
The create() method of the CharacterRendererFactory class combines character renderers to get the required one. This step is essential since it changes the final rendering. For instance, if we add the underline before the shadow, the shadow will also have an underline. In the other case, if we add the underline after the shadow, there is no underline in the shadow.
The create() method starts by looking if the renderer is already in the cache:
if style in self.__characterRenderers:
    return self.__characterRenderers[style]
If the renderer for the requested style is in the dictionary, then we return it.
The first renderer we create is the basic one that depends on no other:
currentStyle = TextStyle(style.fontName, style.tileHeight, style.color)
currentStyle.italic = style.italic
currentStyle.bold = style.bold
if currentStyle in self.__characterRenderers:
    characterRenderer = self.__characterRenderers[currentStyle]
else:
    characterRenderer = BasicCharacterRenderer(currentStyle)
    self.__characterRenderers[currentStyle] = characterRenderer
We first create a style that defines a basic style with (or without) bold and italic styles (lines 1-3). Thanks to this style definition, we can check if it is in the cache (line 4), and if so, we don't need to recompute it (line 5). Otherwise, we create the basic renderer (line 6).
In the next lines, we add the underline (if required):
if style.flags & TextStyle.UNDERLINE:
    currentStyle.underline = True
    if currentStyle in self.__characterRenderers:
        characterRenderer = self.__characterRenderers[currentStyle]
    else:
        characterRenderer = UnderlineCharacterRenderer(currentStyle, characterRenderer)
        self.__characterRenderers[currentStyle] = characterRenderer
We use the same trick to check if the renderer already exists in the cache.
The management of the outline is similar:
if style.flags & TextStyle.OUTLINE:
    currentStyle.outline = True
    currentStyle.outlineColor = style.outlineColor
    currentStyle.outlineThickness = style.outlineThickness
    if currentStyle in self.__characterRenderers:
        characterRenderer = self.__characterRenderers[currentStyle]
    else:
        characterRenderer = OutlineCharacterRenderer(currentStyle, characterRenderer)
        self.__characterRenderers[currentStyle] = characterRenderer
The shadow is a bit trickier since we have two renderers:
if style.flags & TextStyle.SHADOW:
    currentStyle.shadow = True
    currentStyle.shadowColor = style.shadowColor
    currentStyle.shadowShift = style.shadowShift
    if currentStyle in self.__characterRenderers:
        characterRenderer = self.__characterRenderers[currentStyle]
    else:
        # We need a renderer with the shadow color and no shadow
        shadowColorStyle = copy.deepcopy(currentStyle)
        shadowColorStyle.shadow = False
        shadowColorStyle.color = style.shadowColor
        shadowColorStyle.outlineColor = style.shadowColor
        shadowCharacterRenderer = self.create(shadowColorStyle)
        # The text + shadow renderer
        characterRenderer = ShadowCharacterRenderer(currentStyle, characterRenderer, shadowCharacterRenderer)
        self.__characterRenderers[currentStyle] = characterRenderer
Note lines 9-12: we create a text style similar to the current one, except that there is no shadow and all colors are the shadow color.
Final program
In the next post, we'll see how to render text with mixed styles.