
OpenGL 2D Facade (17): Mixed text styles
In the previous program, we had to create one text layer for each text style (bold, shadowed...). In this post, I propose to render text with mixed styles from a single layer.
This post is part of the OpenGL 2D Facade series
Objective
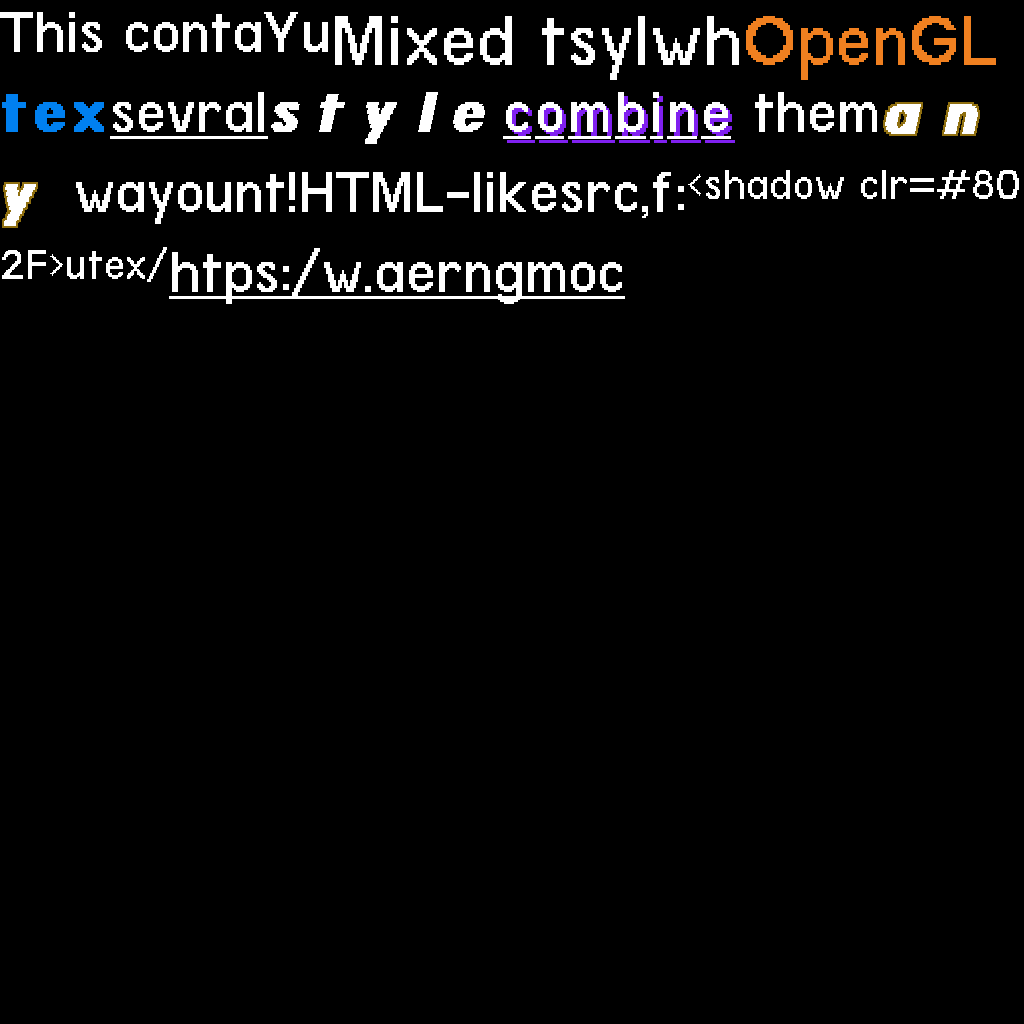
Using HTML-like source code, we want to render a text block with many styles. For instance, the following source:
<s size=80>Mixed text styles with <s color=#F08020>OpenGL</s></s>
This <b><s color=#0080F0>text</s></b> contains <u>several</u> <i><b>styles</b></i>
You can <shadow color=#8020F0><u>combine</u></shadow> them <outline color=#907010><b><i>any</i></b></outline> way you want!
HTML-like source, for instance:
<s size=48><shadow color=#8020F0><u>text</u></shadow></s>
<u>https://www.patternsgameprog.com</u>"
Leads to this rendering:
At the end of the program, the program automatically generated the following tileset:
Proposed approach
Divide and conquer
We have to parse the HTML-like source to identify the style changes. We could do that in the text layer, but that would give it too many tasks. The right software design approach is to split features into different objects/entities and make them as independent as possible.
In the current case, we have the HTML parsing on one side and, on the other side, the rendering of the characters. To get as independent as possibles objects, we need something to communicate between them. To do so, I propose to consider text tokens: the parser outputs these tokens, and the text layer consumes them.
Tokenization is a usual approach for parsing and processing text. Most compilers follow this strategy: they first tokenize the source code and then turn the tokens into machine code. In our case, we only need two types of tokens: text content and style change. Note that this tokenization does not need to know anything about the text layer; only the expected type of tokens is required.
On the text layer side, we only need a list of tokens. Then, we render each text content token with the current style and change the current style when we encounter a style token. It is as simple as that! Also, note that we don't need to know anything about the styles and how to use them since we have the renderer factory (presented in the previous post). Finally, remark that the tokens' origin does not need to be a tokenizer; any other process can build a token list.
HTML-like syntax
To encode the text styles using an HTML-like encoding, I propose to use the following definitions. It is not mandatory to use this syntax; there are endless possibilities! You can create one that meets your needs if you want.
- Bold:
<b>text</b> - Italic:
<i>text</i> - Underline:
<u>text</u> - Shadow:
<shadow color=#012345>text</shadow> - Outline:
<outline color=#012345>text</outline> - Color/Size:
<s color=#012345 size=32>text</s>
We could extend some cases: we could add a "color" attribute for the underline tag. As you will see from the following, it is easy.
Text tokenizer
Design
First of all, we need classes to represent the two type of tokens:
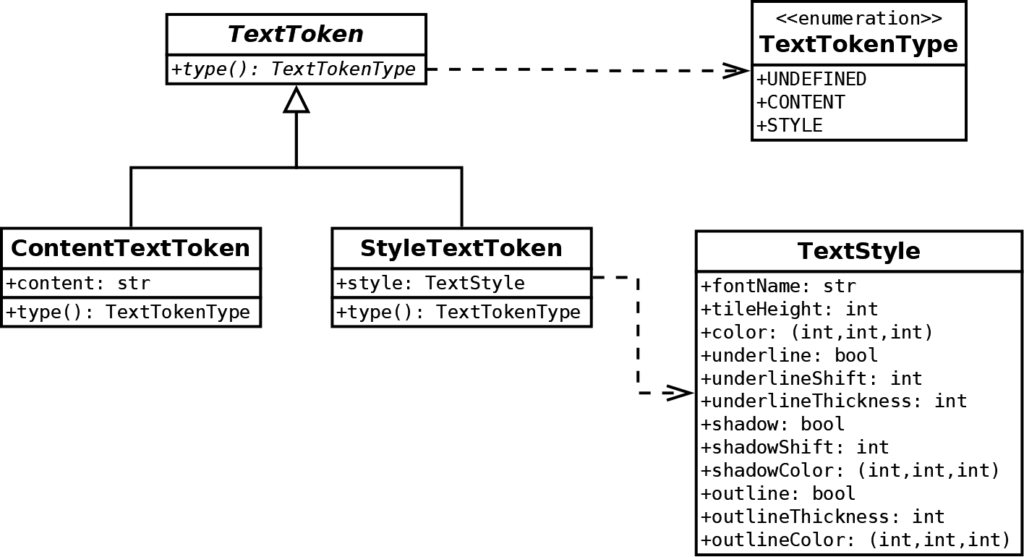
The implementation is straightforward: the type() method of ContentTextToken returns TextTokenType.CONTENT, and the one of StyleTextTokenreturns TextTokenType.STYLE. Then, in each case, the class returns the data it contains (text content or text style).
Then, we implement an HTMLParser from the Python standard library:
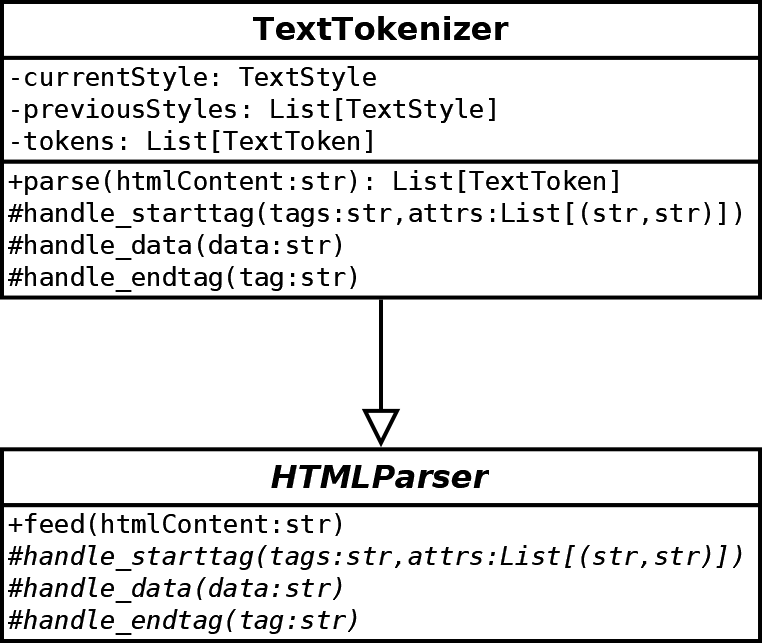
We only consider three methods of HTMLParser:
- The
handle_starttagmethod is triggered when a tag is starting (for instance, a<b>). In this case, we update thecurrentStyleattribute and save the previous one inpreviousStyles. We also add a new style token to thetokensattribute. - The
handle_datamethod is triggered when there is content. Note that the library handles entities (like<); we don't have to worry about them. In this case, we add a new content token to the list. - The
handle_endtagmethod is trigeered when a tag is ending (like</b>). We update the style attributes and add a new style token to the list.
Implementation of handle_starttag()
def handle_starttag(self, tag, attrs):
    if tag == "s":
        self.__previousStyles.append(self.__currentStyle)
        self.__currentStyle = copy.deepcopy(self.__currentStyle)
        for attr in attrs:
            if attr[0] == "color":
                self.__currentStyle.color = hex_to_rgb(attr[1])
            elif attr[0] == "size":
                tileHeight = int(attr[1])
                self.__currentStyle.tileHeight = tileHeight
                self.__currentStyle.updateShifts(tileHeight)
            else:
                raise RuntimeError("Invalid or unsupported attribute {} in tag {}".format(attr, tag))
    else:
        self.__currentStyle = copy.deepcopy(self.__currentStyle)
        if tag == "i":
            self.__currentStyle.italic = True
        elif tag == "b":
            self.__currentStyle.bold = True
        elif tag == "u":
            self.__currentStyle.underline = True
        elif tag == "shadow":
            self.__currentStyle.shadow = True
            for attr in attrs:
                if attr[0] == "color":
                    self.__currentStyle.shadowColor = hex_to_rgb(attr[1])
                else:
                    raise RuntimeError("Invalid or unsupported attribute {} in tag {}".format(attr, tag))
        elif tag == "outline":
            self.__currentStyle.outline = True
            for attr in attrs:
                if attr[0] == "color":
                    self.__currentStyle.outlineColor = hex_to_rgb(attr[1])
                else:
                    raise RuntimeError("Invalid or unsupported attribute {} in tag {}".format(attr, tag))
        else:
            raise RuntimeError("Invalid or unsupported tag {}".format(tag))
    self.__tokens.append(StyleTextToken(self.__currentStyle))
We start with the <s> tag (lines 2-13). This one is special because it can update some properties and leave some others unchanged. To ease this, we first save the current style in the previousStyles list (line 3). Then, we perform a deep copy of the current style (line 4). Otherwise, we could update a style held in some other location (remind that Python variables are references!). Finally, we parse all attributes and update the style properties accordingly (lines 5-13). As you can see, it is easy to add other cases!
The other tags are easy to enable/disable since they are all based on a flag. For instance, italic or shadow can be enabled or disabled. It is easy to restore a previous style. As a result, we don't need to save the current style in the previousStyles list.
In each case, we set the property as True. For instance, self.__currentStyle.italic = True for italic, or self.__currentStyle.shadow = True for shadow.
In some cases, there are attributes to parse. For instance, the shadow tag can have a color attribute (lines 24-28). Again, I think it is easy to add other possibilities; let your imagination run wild!
At the end of the method, we add a new style token based on the current style (line 38).
Implementation of handle_data()
The handling of content (e.g. text with no tags) is straightforward. We only have to add a new content token to the list:
def handle_data(self, content):
    self.__tokens.append(ContentTextToken(content))
Implementation of handle_endtag()
The job of this method is to restore the previous style:
def handle_endtag(self, tag):
    if tag == "s":
        self.__currentStyle = self.__previousStyles.pop()
    else:
        self.__currentStyle = copy.deepcopy(self.__currentStyle)
        if tag == "i":
            self.__currentStyle.italic = False
        elif tag == "b":
            self.__currentStyle.bold = False
        elif tag == "u":
            self.__currentStyle.underline = False
        elif tag == "shadow":
            self.__currentStyle.shadow = False
        elif tag == "outline":
            self.__currentStyle.outline = False
        else:
            raise RuntimeError("Invalid or unsupported tag {}".format(tag))
    self.__tokens.append(StyleTextToken(self.__currentStyle))
There are two cases: the one with the <s> tag and the other. The first case uses the styles saved in the previousStyles list (line 3). The other cases only need to set a flag to False (lines 6-17).
At the end of the method, we add a new style token based on the current style (line 18).
OpenGL Text Layer
Set the text from HTML
The setText() method of the OpenGLTextLayer class is updated, and now calls a new setTextTokens() method:
def setText(self, x: float, y: float, html: str):
    tokenizer = TextTokenizer(self.__baseStyle)
    tokens = tokenizer.parse(html)
    self.setTextTokens(x, y, tokens)
The method creates a text tokenizer (line 2), uses it to create the token list from the HTML text (line 3), and calls the setTextTokens() method.
I split text parsing and tokens analysis for two reasons. The first one is the usual one: always divide tasks as much as possible! The second one is to offer the possibility to update the text of the layer from tokens. It is interesting for the facade users to build the tokens themselves, for instance, when building text programmatically.
Set the text from tokens
The setTextTokens() updates the OpenGL mesh using a token list:
def setTextTokens(self, x: float, y: float, tokens: List[TextToken]):
    # First make sure that all character are in the tileset
    for token in tokens:
        if token.type == TextTokenType.CONTENT:
            contentTextToken = typing.cast(ContentTextToken, token)
            content = contentTextToken.content
            self.__updateTileset(content)
        elif token.type == TextTokenType.STYLE:
            styleTextToken = typing.cast(StyleTextToken, token)
            self.__tileset.setStyle(styleTextToken.style)
        else:
            raise RuntimeError("Unsupported token type")

    # Set the quads
    x0 = x
    charIndex = 0
    for token in tokens:
        if token.type == TextTokenType.CONTENT:
            contentTextToken = typing.cast(ContentTextToken, token)
            for character in contentTextToken.content:
                if character == "\n":
                    x = x0
                    style = self.__tileset.getStyle()
                    y += style.tileHeight
                    continue
                tile = self.__tileset.getCharacterTile(character)
                self.__setQuadTile(charIndex, tile.x1, tile.y1, tile.x2, tile.y2)
                self.__setQuadLocation(charIndex, x, y, x + tile.width, y + tile.height)
                x += tile.advance
                charIndex += 1
                if charIndex >= self.maxCharacterCount:
                    break
        elif token.type == TextTokenType.STYLE:
            styleTextToken = typing.cast(StyleTextToken, token)
            self.__tileset.setStyle(styleTextToken.style)
        else:
            raise RuntimeError("Unsupported token type")
        if charIndex >= self.maxCharacterCount:
            break

    self.setRenderedFaceCount(charIndex)
The first part (lines 3-12) ensures that all characters are in the tileset. If so, the characters' location will not change in the tileset (for the current token list). As a result, it is safe to run the following loop that assigns a texture location to each quad.
The second part also iterates through the tokens (lines 15-41). When we encounter a content token, we process each character it contains (lines 19-32). It is similar to what we previously have done, except for the tile height that depends on the current style (lines 23-24). This height can change if the text height changes. When we encounter a style token, we change the tileset generator's current style (lines 33-35).
Note that this implementation is straightforward because the tileset generator handles a lot of the job. We implemented this generator without dependencies to OpenGL, which was much easier! Again, it shows the power of these design strategies.
Example of use
The rendering of the text with all the different styles now only requires a single layer:
textLayer = guiFacade.createTextLayer()
style = TextStyle("assets/font/terminal-grotesque.ttf", 64, (255, 255, 255))
textLayer.setStyle(style)
textLayer.setMaxCharacterCount(300)
textLayer.setText(
    64, 64,
    "<s size=80>Mixed text styles with <s color=#F08020>OpenGL</s></s>\n\n\n"
    "This <b><s color=#0080F0>text</s></b> contains <u>several</u> <i><b>styles</b></i>\n"
    "You can <shadow color=#8020F0><u>combine</u></shadow> them <outline color=#907010><b><i>any</i></b></outline> way you want!\n\n"
    "HTML-like source, for instance:\n"
    "<s size=48><shadow color=#8020F0><u>text</u></shadow></s>\n\n"
    "<u>https://www.patternsgameprog.com</u>"
)
We need to define a base style, from which each other style is derivated (lines 2-3). Note that the current character count is the number of displayed characters, not the HTML-like source's length (line 4).
Final program
In the next post, we'll see how to create frame boxes.