
2D Strategy Game (12): Minimap
Still exploring the data view concept, we add the handling of worlds larger than the screen. We also add a minimap frame to let the player change the current view.
This post is part of the 2D Strategy Game series
The minimap represents each world cell with a single color, and a white rectangle shows the currently visible part:
Only render the visible part
We first add a new view attribute in the LayerComponent class, the superclass of all world components. This tuple of two integers (x,y) defines the top left corner of the current world view.
Then, for each layer, we compute the coordinates of visible cells:
def render(self, surface: Surface):
    tileWidth, tileHeight = self.tileset.tileSize
    layerWidth, layerHeight = self.layer.size
    surfaceWidth, surfaceHeight = surface.get_size()
    viewX, viewY = self.view
    for y in range(0, surfaceHeight + 1, tileHeight):
        cellY = (y + viewY) // tileHeight
        if cellY < 0 or cellY >= layerHeight:
            continue
        for x in range(0, surfaceWidth + 1, tileWidth):
            cellX = (x + viewX) // tileWidth
            if cellX < 0 or cellX >= layerWidth:
                continue
            cell = (cellX, cellY)
            dest = (x - viewX % tileWidth, y - viewY % tileHeight)
            # Draw tile...
Line 6 iterates through all vertical pixel coordinates on the screen. It goes from the top (0) to the bottom plus one (surfaceHeight + 1). We add one pixel to handle rounding effects in the next line. These iterations have a step equal to the height of a tile (third argument of range()). For example, with a height of 16 pixels, the values of y are 0, 16, 32, ...
Line 7 shifts the coordinate with the current view and converts it to a cell coordinate. Then, lines 8-9 ensure that this coordinate is inside the world.
We repeat a similar process for the horizontal coordinates in lines 10-13. Line 14 builds a tuple with the world coordinates of the current cell to render. Finally, line 15 computes the pixel coordinates of the tile on the screen.
Python generators
We can start the render() method of each LayerComponent child class with the one from the previous section. However, it would be more efficient to have only one instance of this procedure: it will be easier to maintain if we need to change something.
A first approach uses the Strategy pattern, where a class for each layer implements the rendering process's initialization, cell rendering, and finalization. It works fine, but it leads to a lot of code lines.
We can use a more elegant method thanks to the Python language: generators. They allow the generation of values and an easy iteration through these values, whatever the complexity of the generation process:
def generator(n):
    for i in range(n):
        if (i % 2) == 0:
            yield i
for number in generator(6):
    print(number)
This example creates a generator that lists all even numbers between 0 and n-1. Then, we can use this generator as if it was a container. Perhaps the following modification can help the understanding:
container = list(generator(6))
for number in container:
    print(number)
In this example, we create a list using all the generated values (line 1). Note that, even if it looks similar, the generation process does not first create and store all values and then provide them.
Python calls the generator every time it needs a value. Then, inside the generator function, if it encounters the yield keywords, it pauses the generation and provides the value. The code flow returns to the generator when another value is requested.
We create a new generator renderedCells() in the LayerComponent class. It is like the render() above, except that we yield the values instead of using them:
def renderedCells(self, surface: Surface):
    ...
    for y in range(0, surfaceHeight + 1, tileHeight):
        cellY = ...
        for x in range(0, surfaceWidth + 1, tileWidth):
            cellX = ...
            dest = ...
            value = layer.getValue((cellX, cellY))
            yield dest, value, (cellX, cellY)
We provide the tile location on-screen (dest), the cell value (value), and the cell world coordinates ((cellX, cellY)).
Then, in the render() method of child classes of LayerComponent, we iterate through the cells of this generator:
def render(self, surface: Surface):
    ...
    for dest, value, cell in self.renderedCells(surface):
        ... render cell ...
The resulting code is more straightforward: we have a single for loop with no complex computations! Furthermore, if we need to change how we compute the tile coordinates on-screen, we only have the update the renderedCell() generator.
Render the minimap
Tile colors: we want to create a minimap where each pixel represents a tile. As a result, we need to choose a color for each possible tile. We compute these colors only once in the Tileset class, in the getTilesColor() method:
def getTilesColor(self, valueRange: Tuple[int, int]) -> Dict[int, Color]:
    colors = {}
    for value in range(valueRange[0], valueRange[1]):
        rects = self.__tilesRects[value]
        color = pygame.transform.average_color(self.surface, rects[0])
        colors[value] = color
    return colors
The output of this method is a dictionary that maps a cell value to a Pygame color. Then, we iterate through a range of values (line 3), get the tile rectangle in the tileset (line 4), and compute its average color (line 5).
Render: we create a new MinimapFrame class that shows and handles the minimap. Inside this class, we implement a renderMinimap() method that builds the minimap of the whole world in a Pygame surface:
def __renderMinimap(self):
    layers = list(zip(
        reversed(self.__world.layerNames),
        reversed(self.__world.layers)
    ))
    worldWidth, worldHeight = self.__world.size
    minimapSurface = Surface((worldWidth, worldHeight))
    for y in range(worldHeight):
        for x in range(worldWidth):
            for name, layer in layers:
                value = layer.getValue((x, y))
                if value != CellValue.NONE:
                    color = self.__colors[name][value]
                    minimapSurface.set_at((x, y), color)
                    break
    self.__minimapSurface = minimapSurface
We can not represent all tiles of a given cell with a pixel: we choose the color of the front layer. However, we don't know which layer is the front layer for each cell: some of them may render nothing. As a result, we need to iterate through all layers in reverse order, from the last to the first. It is what we do in lines 10-15: we iterate through the layers list (line 10), get the cell value (line 11), and if this value is not NONE (line 12), we get its color (line 13), draw the pixel in the minimap (line 14), and stop the iteration (line 15).
This process works fine if the layers list contains the layers (and their name) in reverse order. However, the World class only provides the list of layers and the list of their names. Lines 2-5 convert these two lists into the list of tuples (name, layer) in reverse order.
The reversed() built-in function generates items of a container (or generator) in reverse order. For instance, reversed(self.__world.layerNames) generates "objects", "impassable", and then "ground".
The zip() built-in function iterates through two (or more) containers/generators and generates tuples with interleaved values. In our example, it generates ("objects", object layer), ("impassable", impassable layer), and then ("ground", ground layer).
These two functions do not create data: as a result, they can generate data only once. Since we often need their values, we use the list() built-in function to store them.
If this is not clear, the following line do the same job, but in a less pythonic way:
layers = []
layerNames = self.__world.layerNames
layerInsts = self.__world.layers
layerCount = len(layerNames)
for layerIndex in range(layerCount, 0, -1):
    name = layerNames[layerIndex - 1]
    layer = layerInsts[layerIndex - 1]
    layers.append((name, layer))
Minimap frame and view update
The MinimapFrame class is a child of FrameComponent, and draws the minimap surface on top of a frame box. Drawing this surface and the view rectangle is tricky: the surface can be larger than the frame box, and the view rectangle should not get outside the frame. We don't detail this; it has nothing interesting for the programmer and designer. However, the management of minimap and view updates is worth the description.
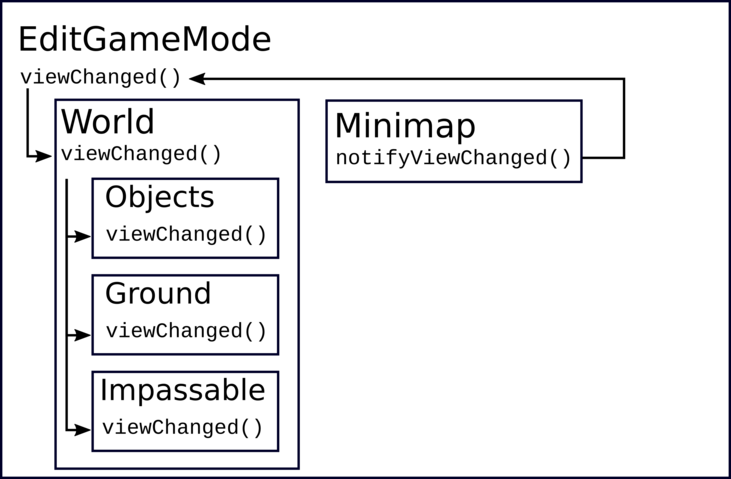
We first extend the Observer pattern of the UI Components. We create a new viewChanged(view) method in the IComponentListener class, and a new notifyViewChanged(view) method in the Component class. The former is triggered when the view changes, and the latter triggers the calls to viewChanged().
In the mouseButtonDown() method of the MinimapFrame class, we compute new view coordinates according to the mouse location. Then, we call the notifyViewChanged(), so each listener of the MinimapFrame class gets the new view coordinates.
A first approach lets layer components listen to the minimap: we implement the viewChanged() method in the LayerComponent class, which updates the view attribute and sets needRefresh to True to force the repainting of the world layers. It works fine, but it is not handy: it is not easy to get the references of all layer components, and every time we add or remove a layer, we have to update this code.
A better approach uses what we did with the composite components: they automatically propagated the calls to the IComponentListener method to their children. Then, since EditGameMode and WorldComponent are composites, we only need to let the main container (EditGameMode) listen to MinimapFrame! As a result, when the minimap sends its notification, it goes to EditGameMode, which sends the view change to WorldComponent (and other children), and this latter one transmits to all layer components:
Final program
In the next post, we render text with icons and different styles.