
2D Strategy Game (19): Cities
We add cities to the game!
This post is part of the 2D Strategy Game series
The following video shows the new city screen:
The city screen
The heart of a city is a dungeon: when the player clicks on it, the city screen appears:
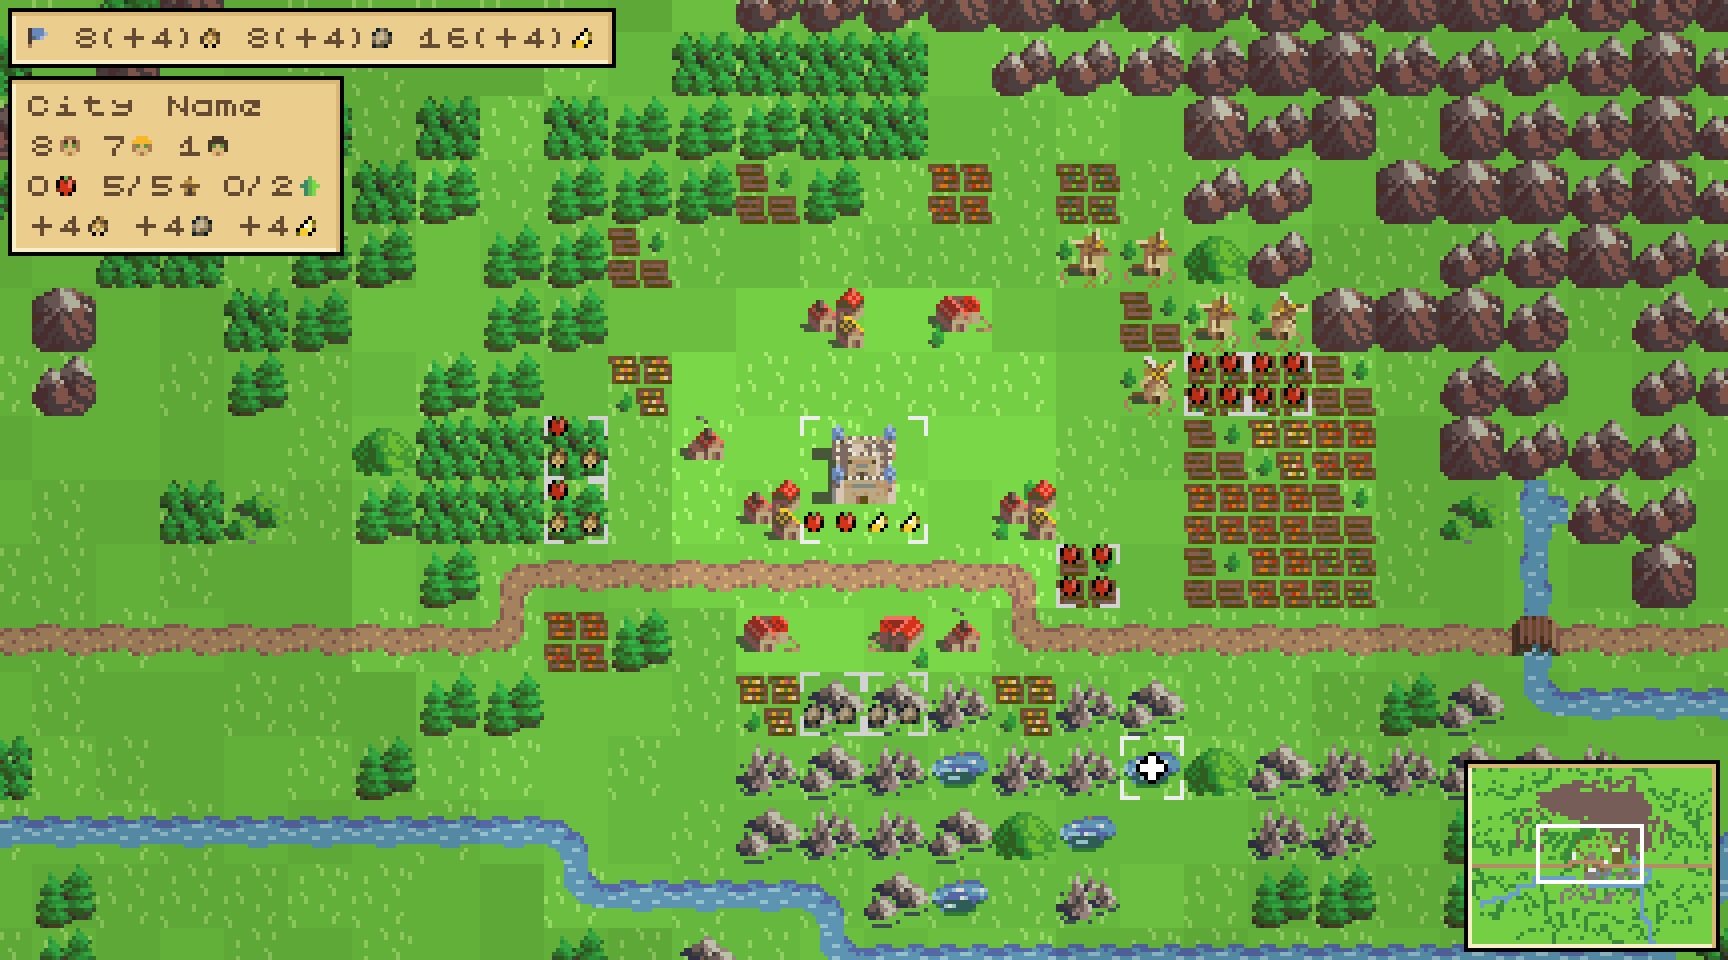
We center the view on the dungeon and present different areas using shadowing levels. The close area around the dungeon (no shadowing) is where houses can appear. The larger area (seven-tile radius, light shadowing) contains tiles citizens can work on. The remaining area (seven or more tiles away, medium shadowing) is outside the city.
The top-left frame contains the current amount and production of wood, stone, and gold. For example, in the screenshot above, the blue player has eight woods and produces four woods every turn.
The frame below this resources frame is the city frame. It presents pieces of information on several lines:
-
The first line shows the city's name (here, "City Name").
-
The second line has three values:
- The total number of citizens (in the example, 8). There are as many citizens as there are houses around the dungeon. Each citizen can be a worker or a merchant.
- The total number of workers (in the example, 7). We assign each worker to a tile in the city area: we can see them and the resources they produce in the screenshot. For instance, two worked tiles on the left of the dungeon produce one food and two woods.
- The total number of merchants (in the example, 1). If we don't assign a citizen, he automatically becomes a merchant, and produces two golds.
-
The third line presents three items:
- The food production (in the example, 0). It is what the citizens and the dungeon produce, minus what citizens eat (two food per citizen). So in the example, the city produces 1+1+4+4+4+2=16 foods, and citizens consume 8x2=16 foods. The balance is then zero.
- The food in the granary and the granary capacity (in the example 5 and 5). The city stores exceeding food in the granary, as much as the granary can hold. In this example, the granary is full, so having excess food production is not interesting.
- The current growth points and the number to reach to get a new citizen (in the example 0 and 2). The city gains a growth point as long as all citizens can eat. Once there are enough growth points, and if there is a free tile for a new house around the dungeon, the city population increases.
-
The fourth line shows the wood, stone, and gold production. It depends on the worked tiles and the number of merchants.
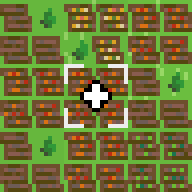
We can turn a merchant into a worker with a click on an unassigned cell. When it is possible, a "+" symbol appears:
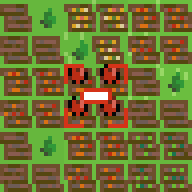
On the contrary, we can turn a worker into a merchant by clicking an assigned cell. A "-" symbol appears in these cases:
Game state
We update the game state in the following way:
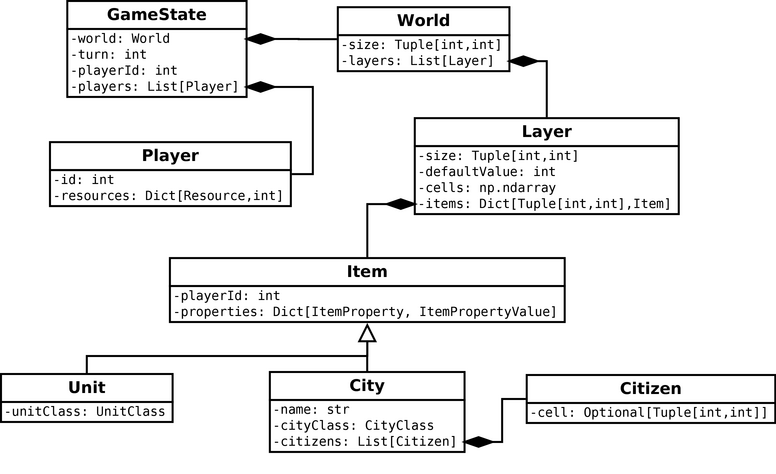
We first create a Player class that contains a player's id and resources and put a list of players in World.
We create a new "buildings" layer in the constructor of World:
class World:
    def __init__(self, size: Tuple[int, int]):
        self.__size = size
        self.__layers = {
            "ground": Layer(size, CellValue.GROUND_SEA),
            "impassable": Layer(size, CellValue.NONE),
            "objects": Layer(size, CellValue.NONE),
            "buildings": Layer(size, CellValue.NONE),
            "units": Layer(size, CellValue.NONE),
        }
    ...
This new layer works like the "units" layer, where each cell has an associated item. In this new case, we associate an instance of City with non-empty cells.
The "buildings" layer has three possible values:
CellValue.NONE: the cell is empty.CellValue.BUILDINGS_CITY: this is a city cell.CellValue.BUILDINGS_ASSIGNED: a city works on this cell. We use this case to know if a cell is free and thus avoid several cities working on the same tile.
City has a citizens list that contains instances of Citizen. Each citizen has a cell attribute that, if not None, holds the coordinates of a cell worked by the citizen.
Note that there is redundancy in this data: cells worked by cities are in the buildings layer and citizen lists. We could only use one of the two but would have to run large scans. This design is more handy, but we must be sure that when we modify one, we also modify the other. In the other case, for instance, we could have a citizen working on a cell in an instance of City but no corresponding cell in the buildings layer.
Game logic
We add two commands, AssignCitizen and UnassignCitizen, which, given a city and a world tile, (un)assign a citizen. They modify citizens in City instances and the building layer, ensuring data consistency. In all the code, we always use these commands, even explicitly, to modify cell assignments.
We add a new SetBuildingsCell command that modifies the building layer. A particular part of this process is the setting of the city cells, represented by four cells (2x2 close cells). Furthermore, we forbid the creation of cities too close to each other: we must check the distance to the others and allow the execution only if the new city is far enough.
We also update the NextTurn command, updating players' resources and cities' citizens. There are a lot of computations for these updates: we gather them in a new Rules class in the core.logic package. Each method of this class handles a computation, like returning the city areas or counting the resources it produces. This approach reduces code duplication: it saves development time, and updates are less risky. It is also interesting if we want to provide different rulesets. For instance, game rules in a solo campaign can differ from those for online multiplayer gaming.
Most methods in the Rules class perform simple computations we don't detail here. However, some are more tricky, like the computation of resources for a tile. For instance, a farm tile produces four foods, or a forest tile produces two woods and one food. To ease these definitions (and later make them moddable), we define a Resource enum for resources: for instance, Resource.FOOD represent the food resource. Then, we define tile productions in a large dictionary hierarchy (NB: we present here a reduced version of this data, you can see the complete one in the attached code):
tileProduction = {
    CellValue.GROUND_EARTH: {
        CellValue.NONE: {
            CellValue.NONE: [Resource.FOOD, Resource.FOOD],
            CellValue.OBJECTS_TREES: [Resource.WOOD, Resource.WOOD, Resource.FOOD],
            CellValue.OBJECTS_FARM: [Resource.FOOD, Resource.FOOD, Resource.FOOD, Resource.FOOD],
        },
        CellValue.IMPASSABLE_POND: {
            CellValue.NONE: [Resource.FOOD, Resource.FOOD, Resource.FOOD],
        },
    },
    CellValue.GROUND_SEA: {
        CellValue.NONE: {
            CellValue.NONE: [Resource.FOOD, Resource.GOLD]
        }
    }
}
We can find the resources of a tile with tileProduction[<ground>][<impassable>][<objects>], where <ground> is the ground layer value (earth, sea), <impassable> the impassable layer value (pond, mountain, etc.) and <objects> the objects layer value (farm, forest, etc.).
This structure makes production definitions compact and easy to add. It also simplifies the computation of a tile production (compared to an endless list of if/elif!):
# cell = coordinates of the tile
groundValue = world.ground.getValue(cell)
impassableValue = world.impassable.getValue(cell)
objectsValue = world.objects.getValue(cell)
if groundValue in tileProduction:
    impassableProduction = tileProduction[groundValue]
    if impassableValue in impassableProduction:
        objectsProduction = impassableProduction[impassableValue]
        if objectsValue in objectsProduction:
            return objectsProduction[objectsValue]
return []
Rendering
Dungeon tile. For rendering the dungeon at the center of a city, we want to use a 2x2 tile. As before, we try to keep the game state as simple as possible, and let the rendering handle the aesthetics. Consequently, the cell values of a dungeon are all the same: for the game state and logic, we don't care if a dungeon tile is the top-left or bottom-right:
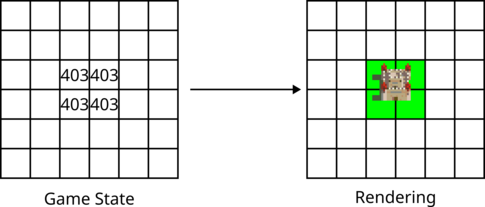
In a previous post, we rendered large tiles with selection. We directly draw a 2x2 tile from the top-left corner in this case. The problem with this approach is that the drawing disappears on top and left of the screen: this is not an issue for selection, but it might look strange for dungeons.
The solution we choose guesses which tile to render (top-left, top-right, bottom-left, or bottom-right) by looking at the tile around:
leftValue = buildings.getValue(coords, Direction.LEFT)
topValue = buildings.getValue(coords, Direction.TOP)
if leftValue != CellValue.BUILDINGS_CITY:
    if topValue != CellValue.BUILDINGS_CITY:
        surface.blit(tileset, dest, rects[0])
    else:
        surface.blit(tileset, dest, rects[2])
else:
    if topValue != CellValue.BUILDINGS_CITY:
        surface.blit(tileset, dest, rects[1])
    else:
        surface.blit(tileset, dest, rects[3])
In this code, coords are the coordinates of the world cell we want to render, buildings is the building layer, tileset is the Pygame surface with the building tileset, dest is the location on the screen of the cell, and rects are the coordinates of the top-left, top-right, bottom-left, or bottom-right tiles in the tileset. Note that this trick does not work if large tiles are stuck together: in our case, it never happens, since we ensure a minimum distance between dungeons.
Resource icons. For each cell a citizen works on, we want to display the harvested resources. For instance, on a forest tile, we draw two woods and one food icon:

To render these resources, we create a new ResourcesComponent class. We don't want to recode a new layer rendering system because icons are smaller than tiles. We also don't want to precompute all possible tile productions (drawing of several icons inside a single tile): there are many of them, which could take too much memory. Instead, we define ResourcesComponent as a child of LayerComponent, and claim in the constructor that the tiles of this layer component are as usual (we pick any other layer, for instance "selection", even if we will never render a tile from it!). Then, we manually draw icons in the tile rendering loop:
valid = cells == CellValue.BUILDINGS_ASSIGNED
for dest, _, item, cell in renderer.items(valid):
    if item != city:
        continue
    resources = rules.computeCellResources(city, cell)
    shiftX = mainTileSize[0] // 2
    shiftY = mainTileSize[1] // 2
    x, y = 1, mainTileSize[1] - shiftY
    for resource in resources:
        rect = tilesRects[resource][0]
        surface.blit(tileset, (dest[0] + x, dest[1] + y), rect)
        x += shiftX
        if (x + tileSize[0]) >= mainTileSize[0]:
            x = 1
            y -= shiftY
Line 1 selects cells assigned to a building.
Lines 2-4 iterate through these cells and choose the one assigned to the current city (the one the city screen focuses on).
Line 5 uses a method of Rules to get the resources produced by the tile at coordinates cell. Note that it is the same method we call in the commands: we ensure that what we display is also what we use in the game logic.
Lines 6-7 compute the distance between the icons. Here this is a setup for 2x2 icons per tile. We can reduce these shifts if we have more than four icons to draw (see attached code).
Line 8 initializes the (x,y) icon location inside the tile (we start from the bottom-left corner).
Lines 9-15 draw the icons: each iteration blits one icon given the current location (x,y), then updates it to go right and up.
Final program
In the next post, we add tootips.